A place to drop the work coming off my bench: the Mustang firmware for the T41-EP software-defined transceiver, photos of the build, and the chassis system that holds it all together.
Mustang 2 overview
Mustang 2 V1.0.25 on the Pi Touch Display · 4 min 33 s · A look at the Raspberry Pi 5 secondary CPU running the radio’s screen: tuned to the FT8 calling frequency on 20 m with the live spectrum, waterfall, audio spectrum and Settings pane, and the toolbar and cascading Menu driven with a mouse. More on the Secondary CPU and Remote Access pages.
Mustang V1.0.39 · Mustang 2 V1.0.34 · as of 4 Oct 2026
Mustang Settings and Menu References
Mustang Settings and Menu References
Covers the on-radio Menu system for the T41-EP SDR Mustang firmware: 9 primary categories, each holding a list of secondary options. Navigate with the front-panel Menu button and encoders – left/right selects a primary category, up/down selects an option within it, and the value knob adjusts a selected “variable” option (one with a numeric or on/off value). A “function” option runs immediately when selected, with no value to adjust.
Mustang 2 uses the same menus, with a few additions, and the same Menu can also be opened from the Pi Touch Display and the web and phone remotes (see Secondary CPU and Remote Access). Tags used below:
Mustang 2 only in the Mustang 2 firmware.
Pi & remotes only added by the Pi; only in the Pi Touch Display and web/phone remote menus, not on the radio itself.
Greyed out on Pi & remotes shown but not selectable from the Pi or the remotes for now, because that screen hasn’t been built for them yet. It still works normally from the radio’s front panel.
Also on Pi & remotes a screen that also opens on the Pi and the remotes.
Own dropdown on the Pi and the remotes this whole menu has its own toolbar button instead of sitting under Menu — see Pi & Remote Toolbar.
On the Pi Touch Display and the web and phone remotes, the menus above are reached from toolbar buttons rather than the radio’s Menu button. Every pick sends the radio exactly the same menu selection as the front panel would; with firmware V1.0.28 or later it jumps straight to the item instead of stepping through every entry on the way. From V1.0.34 every Calibration item works from the Pi and the remotes too.
Button
What it does
Menu
RF Options, EEPROM, Calibration, Diagnostics and Sample Rate, plus Network on the Pi screen.
Display
The Display menu, grouped: Spectrum floor ▸ Auto / Manual / Spectrum floor · Spectrum scale, smoothing, decay, trace smoothing · Spectrum shadow ▸ On / Off · Spectrum fill ▸ On / Off · Brightness ▸ 25–100% · Freq Font ▸ · PI Spectrum ▸ PI Spectrum Fill, PI Waterfall, PI Waterfall Speed.
A plain button: sets the radio’s Volume knob back to audio volume (from AGC / Mic / Sidetone if needed) and points the mouse wheel and arrow keys at it. Mic gain, sidetone and AGC are under Mic, CW and Audio.
Band, Mode, Demod, Course, Fine, Zoom, Filter, Noise, Decode, Home
The same as the matching front-panel buttons. Filter picks Lo Cut or Hi Cut and points the wheel at it.
Current choice highlighted: on any menu with two or more choices the current (or last-picked) one is marked — bold green with a dot on the Pi, a green check on the web. It follows the radio, so front-panel changes show too.
Keyboard (Pi keyboard or the web remote): Up/Down tune (Shift = fine). Left/Right adjust Filter Lo/Hi Cut or Volume after picking it; after Vol all four arrows change the volume. In a Menu value box every arrow changes the value; on the equalizer screen Left/Right pick the band and Up/Down its level. A trackpad scroll moves one step per short swipe and ignores sideways movement.
Readout line above the spectrum: AGC, DSP (RX DSP gain), Scale, Floor, Zoom, CT (course tune step), FT (fine tune step), Noise. Vol (audio volume) is in the Settings pane.
Pi-only settings (Brightness, Freq Font, PI Spectrum Fill, PI Waterfall, PI Waterfall Speed) are shared by the Pi and every open remote, and the Pi remembers them across restarts.
Receive gain applied in the DSP, for all bands. Range −5.0 to +20.0 dB in 0.5 dB steps; shown on the Settings pane as “DSP Gain:”. Raise it if weak signals barely rise above the noise on the spectrum.
Adjust Equalizers Also on Pi & remotes(back to tree)
Opens the receive and transmit audio equalizer screen: 14 bands from about 200 Hz to 4 kHz, levels 0–100. On the radio, button 15 switches RX/TX, the Volume knob picks the band, the Filter knob sets its level, button 16 changes the step (1 or 10) and Home saves and exits.
Mustang 2 From V1.0.26 the same screen opens full-screen on the Pi and the remotes, with Edit RX / Edit TX, Cell ◀ ▶, Level − / +, Incr, Exit and Save & Exit; tap a bar to pick it. From V1.0.27, Exit (button 14 on the radio) puts both equalizers back the way they were and leaves without saving.
Averages each point on the spectrum trace with this many neighboring bins on either side, smoothing the curve at the cost of frequency detail. 0 = off (raw trace); up to 10 (a 21-bin average).
Eases the live green trace's frame-to-frame movement instead of snapping instantly to every new reading, for a steadier-looking trace. 0 s = off (original instant-snap behavior); range 0–0.3 s.
Draws the radio’s spectrum trace filled in, graded green to yellow to red by signal strength. From V1.0.29 the radio always powers up with the fill off; pick this to turn it on until the next power-off.
Draws the spectrum as an outline only. On a very strong or wide signal the filled trace can take long enough to draw that the audio drops out; turn the fill off if audio ever gets choppy. This is the power-up default from V1.0.29.
Style of the frequency readout on the Pi and the remotes: Original, Nixie (glowing orange wire digits in glass tubes, with a tube for each decimal point), VFD (green seven-segment) or Dot Matrix (blue 5×7 dots). Doesn’t change the radio’s own screen.
On / Off (under PI Spectrum): turns the spectrum fill on or off on the Pi’s screen and the web and phone remotes together, separately from the radio’s own Spectrum fill setting above. Always starts Off when the Pi app starts.
2D / 3D (under PI Spectrum). 3D shows the newest spectrum row in front, with older rows stepping back — narrower and higher — and fading away, blue at the base up to yellow, orange and red on strong signals. With firmware V1.0.32 or later the 2D waterfall uses the radio’s own colour for every point, so the background noise is the same blue as on the T41.
PI Waterfall Speed Pi & remotes only(back to tree)
Fast / Medium / Slow / Very slow (under PI Spectrum): about 15, 7, 4 or 2 new waterfall rows a second, for both 2D and 3D. Short signals are never skipped at the slower speeds, and the spectrum trace above stays real-time.
Calibrates the S-meter/dBm reading, per band, against a known reference signal. Range −20 to +50. On the Pi and remotes it opens the usual value box (wheel or arrow keys, Select to confirm) with the S-meter still in view.
Starts the reference-frequency calibration routine: tune to a reference station (WWV, CHU) first, set the modulation to SAM, then adjust the Factor until the Error reads under 1. Mustang 2 From V1.0.30 the same screen opens on the Pi and the remotes, with Factor − / +, Incr, Modulation, Exit (leave without saving) and Save & Exit; the Pi version adds a live spectrum.
Starts the receive I/Q balance calibration routine (corrects phase/amplitude imbalance in the receiver). In Mustang 2 the same screen opens on the Pi and the web and phone remotes, with full control: amplitude and phase adjust, step size, auto-tune, band cycling and Save & Exit. The Pi screen also has Stop (ends an Auto sweep early) and Exit (leave without saving).
Starts the transmit I/Q balance calibration routine (minimises the opposite sideband). Mustang 2 From V1.0.30 the same screen opens on the Pi and the remotes, with IRR / dBc, the current-band values, the all-bands table and buttons for Amp, Phase, Atten, Incr, Auto, Stop (ends an Auto run and releases PTT), Band, Exit and Save & Exit. Key the radio with its own PTT to transmit; Auto keys it automatically, as on the radio.
Starts the transmit power-amplifier calibration routine. Mustang 2 From V1.0.30 the same screen opens on the Pi and the remotes, with the step list (✓ done, ▶ current), Attenuation, measured and target power, the Psat / k / Gain table and buttons for Record (Select), Atten, Power, Incr, Units W/dBm, PA 20/100W, Next step, Reset, Band, Exit and Save & Exit. V1.0.30 also fixes the radio’s own “Transmit:” line, which always read Off.
Runs a built-in-test screen checking the I2C-connected hardware: PASS or FAIL for the front panel, BPF, RF, RF SI5351 and K9HZ LPF boards. In Mustang 2 the results screen also opens on the Pi and the remotes, with a Home button to leave it.
Restore receive EQ Greyed out on Pi & remotes(back to tree)
Resets all receive equalizer bands back to their flat/default values. Greyed out on the Pi and remotes for now; use the front panel.
Buffer print Greyed out on Pi & remotes(back to tree)
Prints diagnostic buffer contents, for debugging. Greyed out on the Pi and remotes for now; use the front panel.
Menu > Network on the Pi’s touch screen opens a full-screen Wi-Fi page: the current network (SSID), 2.4 or 5 GHz, signal and IP address; a list of the networks the Pi can see (signal, band, secured/open, connected/saved); and Rescan, Connect, Forget and Close. Picking a secured network that isn’t saved yet opens a password box with an on-screen keyboard (Shift, ?123 for numbers and symbols, Show/Hide). It isn’t on the web remotes, because switching networks from a browser on the current one would cut it off. After a switch the Pi has a new address, shown on the page.
Settings Pane
The normal on-screen status/readout box (Page 1), shown whenever CW Decode is off. A fixed top row, then a two-column grid, then two full-width bottom rows.
Shows whichever parameter the main Volume/adjust encoder currently controls - the label itself changes to match: Audio Volume (“Vol:”), AGC threshold (“AGC:” - not the AGC mode indicator on the right), Mic Gain (“Mic:”), or Sidetone Volume (“STn:”). Pi & remotes there, Vol: (audio volume) is shown in the Settings pane.
Transmit attenuation actually in effect right now: the CW-mode attenuation value while receiving CW, 0 while in SSB/digital receive (digital transmit uses the SSB path), otherwise the previous reading is held.
Zoom narrows the spectrum/waterfall display around the tuned frequency: at each step up, the displayed bandwidth is cut in half. The rule is simply displayed bandwidth = sample rate ÷ zoom factor, centered on the tuned frequency (half above, half below).
DSP loop CPU load, as a percentage, sampled once per second. Mustang 2 From V1.0.27 it measures only the signal processing; earlier versions also counted time spent waiting for the audio output, which made it read 60–79% after power-up and drop to about 20% once DATA mode restarted the audio.
The firmware version string, right-aligned in red at the bottom of the pane.
CW Settings Pane
Replaces the Settings pane above, in the exact same screen area, whenever CW Decode is turned on (Menu > CW Options / the Decode button). Several rows are read-only reflections of CW Options menu settings; the last four (Dit(ms):, Upd Age:, AvgD/D:, Coeff:) are hardware-testing diagnostics for the CW speed tracker, not user controls.
Mustang 2 From V1.0.34 the Pi and the web and phone remotes switch to this page at the same time as the radio (without Vol: and AGC:, which are on their readout line already), and the decoded text shows on a line under the waterfall on the Pi and in a strip along the bottom of the waterfall on the remotes — with “CW” in green once the decoder locks and the decoded WPM. The radio only keeps its last 15 characters; the Pi keeps a much longer line.
On/Off, with a small colored box next to it: green once the decoder has confidently locked onto a signal, red while on but not locked, hidden while Off.
Auto or Manual - a live, read-only reflection of Menu > CW Options > “CW Manual Mode”: Auto lets CW auto-tune track the signal on its own, Manual hands tuning fully to the operator.
Diagnostic: the raw dit length (ms) currently driving CW decode timing - the number to watch directly (independent of the 1200/x WPM conversion) when investigating whether the speed tracker is responding.
Diagnostic: seconds since the CW speed tracker last updated its dit-length estimate. Should stay at or below about 5s while receiving continuously; climbs without bound while CW Manual Mode has the tracker paused.
Diagnostic: smoothed, exponentially-averaged dit and dah lengths (ms), shown side by side as “dit/dah” - an alternate speed estimate that reacts faster to a genuine speed change than Dit(ms):/WPM:, for comparing against them.
Diagnostic: the raw combinedCoeff correlation value driving CW decode/lock (10 × average correlation × 100 × Goertzel magnitude). Compare by eye against the two thresholds used internally: 50 (must be cleared to feed the character decoder at all) and 120 (must be cleared for the Decoder: lock indicator and WPM:/SNR: to trust the signal).
Mustang is my build of the Phoenix T41-EP SDT firmware, with changes to the display, spectrum and CW decoding. Mustang 2 adds PiLink, the link to the Raspberry Pi 5 Secondary CPU, which brings the Pi Touch Display and remote access from a browser or phone. Download the current releases below, or read what changed in each version.
Firmware .hex: ready to flash with Teensy Loader — see Flashing the .hex. Both are built for the Teensy 4.1; pick one:
With digital mode (USB Type “Serial + MIDI + Audio”). The radio appears on your computer as a USB sound card, “Teensy MIDI/Audio”, for WSJT-X and other digital-mode programs. Press Mode until the display shows DATA. CAT control shares the single USB serial port.
Dual Serial. No digital (USB audio) mode; CAT control gets its own second USB serial port.
In digital mode, set the level sent to the computer with Menu > Microphone > “USB RX level” and the transmit audio level with “USB drive”. DATA mode switches the radio to the 176.4 ksps sample rate.
Source ZIP: the complete Arduino sketch (the MustangSketch folder). Like the Phoenix firmware it’s based on, Mustang is released under the GNU GPL v3.
Mustang 2 is Mustang plus PiLink: the Teensy sends its display data to a Raspberry Pi 5 over a serial link and takes button presses and knob turns back from it. That’s what drives the Pi Touch Display and the web and phone remote. The radio works exactly as before without the Pi connected.
With digital mode is the one to pick for remote access: the web and phone remote get their live receive audio from the Teensy’s USB audio, over a USB cable to the Pi. It’s also the build for FT8 / WSJT-X.
Dual Serial runs the Pi display and remote control, but without live audio in the browser.
Source ZIP: the Teensy sketch (Mustang2Sketch), the Pi software including the web and phone remote pages (PiDisplay), the build documents and the changelogs. The Arduino libraries aren’t included; install the same ones listed under Building from source. Released under the GNU GPL v3, like Mustang.
V1.0.34 powers up in DATA mode on the digital-mode build (set STARTUP_MODE_DATA in Config.h to change that when building from source), with the radio’s spectrum fill off. After flashing, the Settings pane should read “Mustang 2 V1.0.34”. Flash the Teensy and copy the matching PiDisplay folder to the Pi together — the two have to match, or the Pi’s Settings pane stops updating. See the Secondary CPU page for the Pi side.
Flashing the .hex
The .hex file is the finished firmware with every library already built in, so you don’t need the Arduino IDE or any libraries — just PJRC’s Teensy Loader and a USB cable.
Save your settings first. On the radio, use Menu > EEPROM > “Save data to storage” to back up your settings to the SD card.
Get Teensy Loader. It installs with Teensyduino, or download it on its own from PJRC. The Arduino IDE itself can’t open a .hex file; Teensy Loader is the tool that flashes it.
Connect the Teensy 4.1 to your computer with a USB data cable.
Open the file. In Teensy Loader choose File > Open HEX File and pick the Mustang .hex.
Program it. Press the small pushbutton on the Teensy. Teensy Loader erases, programs and reboots it; this takes a few seconds.
Check the version. The version string at the bottom of the Settings pane should read the new version (for example “Mustang V1.0.39” or “Mustang 2 V1.0.34”).
A .hex is built for one board and one set of Tools options (USB Type, CPU Speed). If you need different options, build from source below.
Building from source
Install the Arduino IDE 2 and add Teensy support: in Settings, add https://www.pjrc.com/teensy/package_teensy_index.json to Additional boards manager URLs, then install “Teensy” in Boards Manager.
Install the libraries listed below. Library Manager covers the Adafruit ones and ArduinoJson; copy OpenAudio into your Arduino libraries folder.
Open the sketch. Unzip the source and open MustangSketch/MustangSketch.ino (for Mustang 2, Mustang2Sketch/Mustang2Sketch.ino).
Set Tools options. Board: Teensy 4.1. USB Type: Serial + MIDI + Audio if you want digital (USB audio) mode, or Dual Serial if you don’t. CAT control works with either.
Upload with the radio’s Teensy connected, or use Sketch > Export Compiled Binary to make your own .hex.
Included with Teensyduino, nothing to install: Audio, SD, SPI, Wire, SerialFlash, LittleFS, Time (TimeLib), RA8875 and the Arm CMSIS-DSP math library.
Release Notes
Newest first. Versions not listed had no user-visible changes.
Mustang V1.0.39
V1.0.39 Current
Digital mode now works: fixed a crash that made builds with USB Type “Serial + MIDI + Audio” restart every few seconds at the startup screen. The spectrum zoom used 16 KB of temporary memory on the stack, which overflowed once USB audio was added; that memory now lives in the Teensy’s second RAM bank, which also frees stack space in every build.
First release with a digital-mode (USB audio) firmware download.
V1.0.37 – V1.0.38
Fixed the spectrum at 1x zoom: the frequency scale under the spectrum read 48 kHz high (44.1 kHz at 176.4 ksps), and signals showed up offset from the tuning marker. The tuned frequency is now centered, with the scale and marker matching the signals, at every zoom level.
V1.0.36
Spectrum colors now change at the intended heights: the green → yellow → red breakpoints are measured from the trace’s visible baseline instead of the bottom of the pane.
V1.0.35
Spectrum color breakpoints moved to 1/4 (green → yellow) and 1/2 (yellow → red) of the trace height.
V1.0.34
Spectrum color fill now fades in bands instead of recoloring the whole column.
Light yellow and light red changed to solid yellow and red.
Fixed Menu > EEPROM > “Save data to storage”, which broke saving to and loading from the SD card.
V1.0.33
Spectrum trace is colored by signal strength: green, then yellow, then red.
V1.0.32
Spectrum display settings (floor mode, scale, smoothing, decay, trace smoothing and shadow) are now saved per band instead of globally. Settings files from earlier versions still load.
V1.0.31 Renamed to Mustang
Firmware renamed from K2RRL to Mustang.
New Pane row on the secondary screen uses the same font size as the Settings pane, and adds TI:, FT: and Noise: fields.
V1.0.29
Smaller spectrum trace area on the secondary screen, with a new row below LO Freq.
Fixed a display-corruption bug on that screen.
V1.0.28
REC/XMT indicator moved above the S-Meter on the secondary screen.
New Menu > Display > “Spectrum trace smoothing” setting (0–0.3 s).
Spectrum Scale extended to 17 steps (0–16) with more half-steps.
V1.0.27
New Menu > Display > “Spectrum shadow on/off” option.
V1.0.22 – V1.0.26
Fast Course Tune spins: the frequency readout, spectrum and waterfall now keep up with the knob, at full refresh rate.
The blue shadow trace no longer lags behind the live trace after a fast retune.
V1.0.21
Half-step (0.5 dB/division) presets added to Spectrum Scale.
V1.0.20
New blue “shadow” (peak-decay) trace behind the live green spectrum trace.
V1.0.15 – V1.0.16
Pressing the Course Tune encoder steps through the tuning increments.
Pressing the Fine Tune encoder steps through the fine-tune increments.
V1.0.1 – V1.0.5
CW auto-tune no longer drifts or hunts while the decoder is locked, and waits through normal pauses in the code.
The “Decoder:” lock indicator no longer sticks on green after the signal is lost, and a weak or noisy signal no longer shows a false lock and a stuck WPM reading.
New Menu > CW Options > “AT Grace (s)” setting for how long auto-tune waits before searching again.
V1.0.0 First release (as K2RRL)
Based on the Phoenix (Phx V1.4.0) T41-EP SDT firmware.
Settings pane adds Temp(F) (Teensy CPU temperature, updated every 5 s) and Load (DSP CPU load); the version string shows right-aligned in red.
A clock replaces the Name Badge pane, and pauses while a menu setting is being adjusted.
Key Type shows “STR Key”; the dB/division label moved next to Mode/Demod; the filter Lo/Hi readout was removed from the spectrum pane.
New CW auto-tune, which peaks the fine-tune frequency on the CW signal, and a live decoded-WPM readout.
Mustang 2 V1.0.34
Teensy firmware changes only; each one needs a reflash. Changes that only touch the Pi are under Remote Access and on the Secondary CPU page.
V1.0.34 Current download
CW settings page values sent to the Pi, so the Pi and the remotes switch to the radio’s CW settings page (Decoder with its lock box, AT Grace, Mode, Key Type, WPM, SNR, Dit, AvgD/D, Upd Age, Coeff) whenever Decode is on.
Includes everything from V1.0.26 to V1.0.33 below.
V1.0.33
Decoded CW text sent to the Pi, so it shows under the waterfall on the Pi and along the bottom of the waterfall on the remotes, with the decoded WPM.
V1.0.32
The radio’s own waterfall colours are sent to the Pi, so the Pi and remote waterfalls (including the noise blue) match the T41 exactly.
V1.0.31
Powers up in DATA mode (digital-mode build); set with STARTUP_MODE_DATA in Config.h.
V1.0.30
Calibration > Transmit IQ, Frequency and Power screens on the Pi and both remotes, with full control; S meter level enabled there too.
New Exit (leave without saving) on those three screens and Stop for the Transmit IQ Auto run.
Receive IQ Stop fixes: a Stop pressed while idle no longer cancels the next Auto run, and stopping before GEN no longer jumps to GEN.
Power calibration’s “Transmit:” line now shows On while transmitting.
V1.0.29
The radio’s spectrum fill is off at every power-up; Menu > Display > Spectrum fill turns it on.
V1.0.28
Menu picks from the Pi and the remotes jump straight to the item instead of visibly stepping through every menu entry on the way (new PiLink menu-select message; ignored unless the radio is on its Home screen and not transmitting).
V1.0.27
Audio Equalizer: button 14 is now Exit — puts both equalizers back the way they were when the screen opened and returns Home without saving (Home still saves and exits).
“Load:” now measures only the signal processing. It used to include time spent waiting for the audio output, so it read 60–79% after power-up and dropped to about 20% once DATA mode restarted the audio.
V1.0.26
Audio Equalizer screen data sent to the Pi, so Audio > Adjust Equalizers works on the Pi and both remotes.
“TI:” readout renamed “CT:” (course tune step).
V1.0.25
I2C BIT test results (pass/fail per board: front panel, BPF, RF, RF SI5351, K9HZ LPF) sent to the Pi, so the BIT screen works on the Pi and both web remotes.
Menu items that don’t have a Pi or web screen yet are greyed out on the Pi and remotes (they still work from the front panel).
V1.0.24
Receive IQ calibration: Stop (ends an Auto sweep early) and Exit (leave without saving) buttons on the Pi screen.
V1.0.23
Receive IQ calibration screen on the Pi and both web remotes, with full control: amplitude/phase adjust, step size, auto-tune, band cycling, Save & Exit.
V1.0.22
Sends the T41’s Spectrum fill on/off setting to the Pi.
V1.0.21
Choppy audio fixed. On a strong or wide signal the filled spectrum trace could take long enough to draw that audio blocks were dropped, on the radio’s own speaker as well as the remotes.
New Menu > Display > Spectrum fill on / Spectrum fill off, so the fill can be turned off if it ever comes back. Default on (off from V1.0.29).
V1.0.19 – V1.0.20
RX DSP gain is now worked out once instead of on every audio block; V1.0.20 was a test build used to track down the choppy audio.
V1.0.18
Sends the spectrum floor (manual value or Auto) for a new “Floor:” readout on the Pi and remotes.
V1.0.17
New Menu > RF Options > RX DSP Gain, −5 to +20 dB in 0.5 dB steps (it was already live, with no menu entry to change it).
Sends the spectrum scale for a new “Scale:” readout on the Pi and remotes.
V1.0.16
New button-repeat message: jumping several steps in a dropdown (Zoom, Band, Mode, Demod, Noise, Course/Fine Inc, Vol, BW) now happens almost instantly instead of stepping through each level.
V1.0.15
The Teensy now sends the Menu’s real position to the Pi, so choosing a Menu item from the Pi screen or the remote always lands on the right setting instead of sometimes jumping back to Home.
V1.0.14
The main tuning and fine-tuning knobs can now be turned from the Pi and the remote (new Tune and Fine-tune virtual encoders).
V1.0.13
Sends the visible spectrum span and the band’s legal limits, for the frequency ruler (with out-of-band ticks in red) under the Pi’s spectrum.
V1.0.12
Sends the volume level and which home layout is showing, so the Pi follows the secondary (“Toggle Layout”) screen.
V1.0.11
Fixed: Menu → Display spectrum scale and floor now change the Pi’s spectrum as well as the Teensy’s.
V1.0.10
The Volume knob can be turned from the Pi (the virtual encoder message now carries which knob to turn).
V1.0.9
Sends the red “Label: value” box while a Menu setting is being adjusted, so the Pi can show it and change the value with the mouse wheel.
V1.0.8
New virtual encoder message, so the Pi can turn the Filter knob to pick Menu items. Adds the Decode on/off state.
V1.0.7
Fixed: REC/XMT could show XMT while receiving; it now follows the radio’s own transmit state.
V1.0.6
Sends everything on the Settings pane, including the firmware version, twice a second.
V1.0.5
Sends the live audio-spectrum bars.
V1.0.3 – V1.0.4
Fixed: the spectrum sent to the Pi was a flat line, then missing entirely (a bigger serial transmit buffer).
V1.0.2 and earlier First release
PiLink added: frequency, band, mode, S-meter and spectrum to the Pi, and button presses back from it.
Remote Access
The browser pages run on the Pi, so these updates need no reflash: copy the new files to the Pi and hard-refresh the browser.
/remote — web (laptop / desktop) V1.0.34
V1.0.34 Current download
Calibration > Transmit IQ, Frequency and Power screens, and S meter level (with firmware V1.0.30).
Decoded CW strip along the bottom of the waterfall, and the CW settings page in the Settings box while Decode is on (with firmware V1.0.33 / V1.0.34).
Waterfall in the radio’s own colours (with firmware V1.0.32); brighter blues, and a brighter 3D waterfall.
PI Spectrum Fill starts off; the calibration overlay has a solid background.
V1.0.28
New toolbar: Display, Audio, Mic and CW dropdowns (copies of the radio’s own menus) next to Menu; Vol is now a plain button that points the wheel and arrow keys at the volume.
Display menu grouped (Spectrum floor, Spectrum shadow, Spectrum fill, PI Spectrum), plus new Freq Font (Original / Nixie / VFD / Dot Matrix), PI Waterfall 2D / 3D and PI Waterfall Speed.
Menus highlight the current choice; menu picks jump straight to the item (with firmware V1.0.28).
Audio Equalizer screen with Edit RX / Edit TX, Exit and Save & Exit (with firmware V1.0.26 / V1.0.27).
DSP: added to the readout line, Vol: moved to the Settings pane, TI: renamed CT:.
Trackpad fix (filter edges no longer jump around); arrow keys adjust Filter or Volume after picking them, and tune otherwise.
The S-meter’s “−XXX.X dBm” reading is no longer cut off on the right.
V1.0.25
I2C BIT test results screen; Menu items without a remote screen yet are greyed out.
Receive IQ calibration screen with Stop and Exit buttons and on-screen instructions.
SWR/PWR readout added; the “(USB)” demod name shows again.
Fixed choppy audio caused by playing the stream back at the wrong sample rate.
Spectrum trace made shorter so the waterfall gets more room, with the readout strip (Vol, AGC, Scale, Floor, Zoom, TI, FT, Noise) moved above it.
New Menu > Display > Brightness (Pi screen backlight) and PI Spectrum Fill on/off; Scale: and Floor: readouts.
Brighter spectrum green and a smoother green-to-red fill; larger audio-filter labels.
V1.0.15
Vol, AGC, Zoom, TI, FT and Noise always show across the top of the spectrum; Filter moved into the audio spectrum pane and Power into the Settings pane.
Toolbar buttons keep fixed labels (Course, Fine, Zoom, Filter and so on) instead of showing the current value.
Fixed: S-meter labels cut off at the top, and the frequency ruler running into the waterfall.
Menu selections land on the right setting (with firmware V1.0.15).
V1.0.14 First release
Browser remote on the home network at http://<pi-hostname>:8765/, with a passkey.
Mirrors the frequency, toolbar, S-meter, spectrum and waterfall, audio spectrum, Settings pane and the Menu parameter box.
Mouse-wheel tuning (Shift for fine) and USB rotary encoder support; cascading Menu; BW dropdown and “Wheel:” indicator.
Live receive audio with a Mute button; blue filter-bandwidth highlight on the spectrum.
/mobile — phone (Mustang Mobile) V1.0.55
V1.0.47 – V1.0.55 Current download
Calibration > Transmit IQ, Frequency and Power screens (two buttons a row), and S meter level (with firmware V1.0.30).
Decoded CW strip along the bottom of the waterfall, and a compact CW settings page in the Settings box while Decode is on (with firmware V1.0.33 / V1.0.34).
Waterfall in the radio’s own colours (with firmware V1.0.32); brighter blues, and a brighter 3D waterfall.
PI Spectrum Fill starts off.
V1.0.34 – V1.0.46
New toolbar: Display, Audio, Mic and CW dropdowns (copies of the radio’s own menus) next to Menu; Vol is now a plain button that points the wheel and arrow keys at the volume.
Display menu grouped (Spectrum floor, Spectrum shadow, Spectrum fill, PI Spectrum), plus new Freq Font (Original / Nixie / VFD / Dot Matrix), PI Waterfall 2D / 3D and PI Waterfall Speed.
Menus highlight the current choice; menu picks jump straight to the item (with firmware V1.0.28).
Audio Equalizer screen with Edit RX / Edit TX, Exit and Save & Exit (with firmware V1.0.26 / V1.0.27).
DSP: added to the readout line, Vol: moved to the Settings pane, TI: renamed CT:.
Trackpad fix (filter edges no longer jump around); arrow keys adjust Filter or Volume after picking them, and tune otherwise.
Toolbar is a 6-column grid and the readout line fits on one row, so all four jog sliders (including Filter) stay on screen; the styled frequency fonts don’t push the page down.
V1.0.33
I2C BIT test results screen; Menu items without a remote screen yet are greyed out.
V1.0.31 – V1.0.32
Receive IQ calibration screen, then Stop/Exit buttons and on-screen instructions.
V1.0.30
SWR/PWR readout added; the “(USB)” demod name shows again.
V1.0.27 – V1.0.29
Spectrum fill on/off in the Display menu, then a separate PI Spectrum Fill on/off for the Pi and remotes.
V1.0.26
Fixed choppy audio caused by playing the stream back at the wrong sample rate.
V1.0.23 – V1.0.24
Smaller readout strip font; spectrum trace made shorter with the readout strip moved above it.
V1.0.18 – V1.0.22
Scale: and Floor: readouts, RX DSP Gain in RF Options, and Display > Brightness for the Pi screen’s backlight.
V1.0.14 – V1.0.17
Spectrum fill matched to the waterfall colours; S-meter dBm and audio-filter labels no longer clipped; “Power: 20W”.
V1.0.13
Fixed: the waterfall disappeared after the ruler fix; the trace and waterfall now share the space.
V1.0.12
Fixed: frequency ruler labels running into the waterfall.
V1.0.9 – V1.0.11
REC and “connected” no longer cut off at the top of the screen; REC shows in green.
V1.0.8
Fixed: toolbar buttons shrinking into a corner on the phone.
V1.0.6 – V1.0.7
Toolbar buttons keep fixed labels instead of showing the current value; S-meter labels no longer cut off.
V1.0.3 – V1.0.5
The page fits the phone’s real visible height, so the Filter slider at the bottom is reachable and drags reliably.
V1.0.2
Split into its own phone page at /mobile, so the laptop page stays unchanged.
V1.0.1 First release
Tune, Fine Tune, Volume and Filter touch sliders; four-column button grid; S-meter sized to the screen.
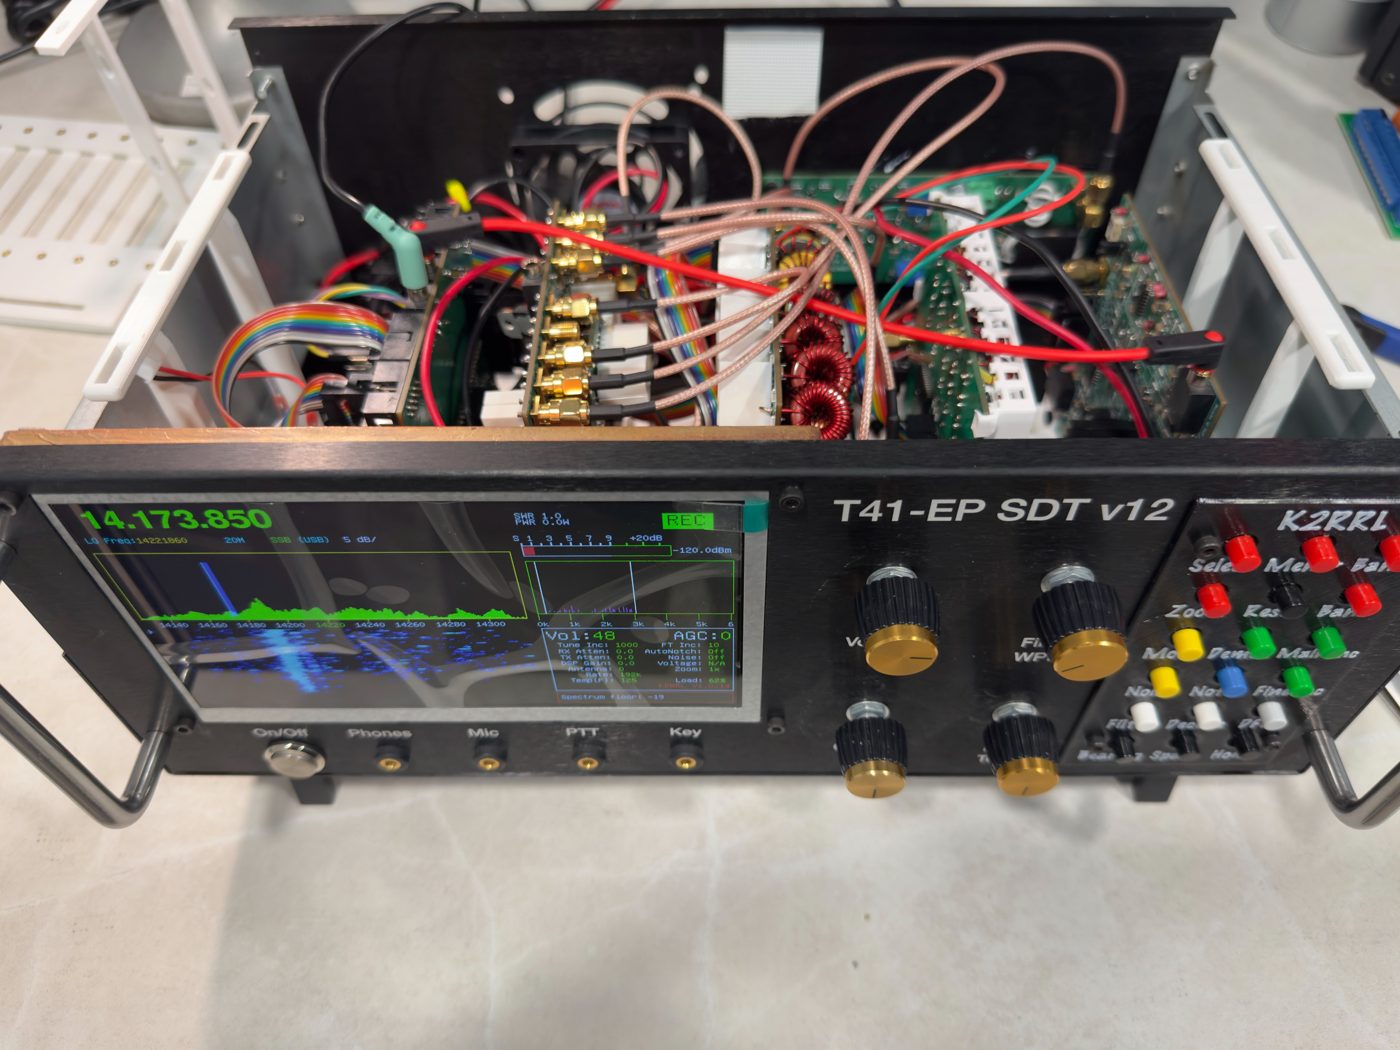
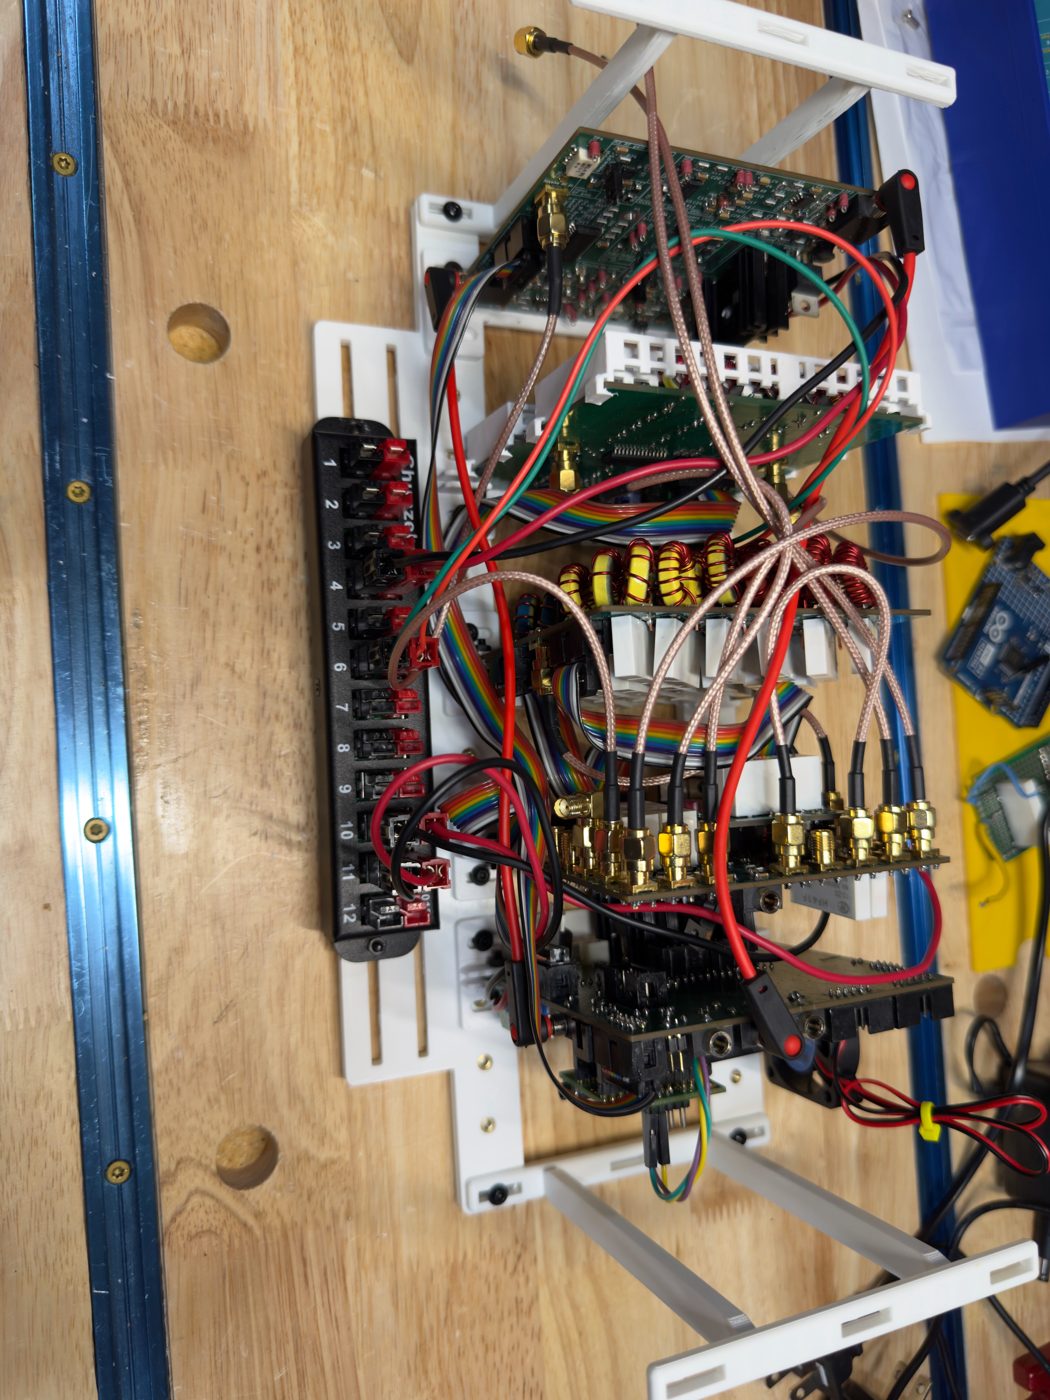
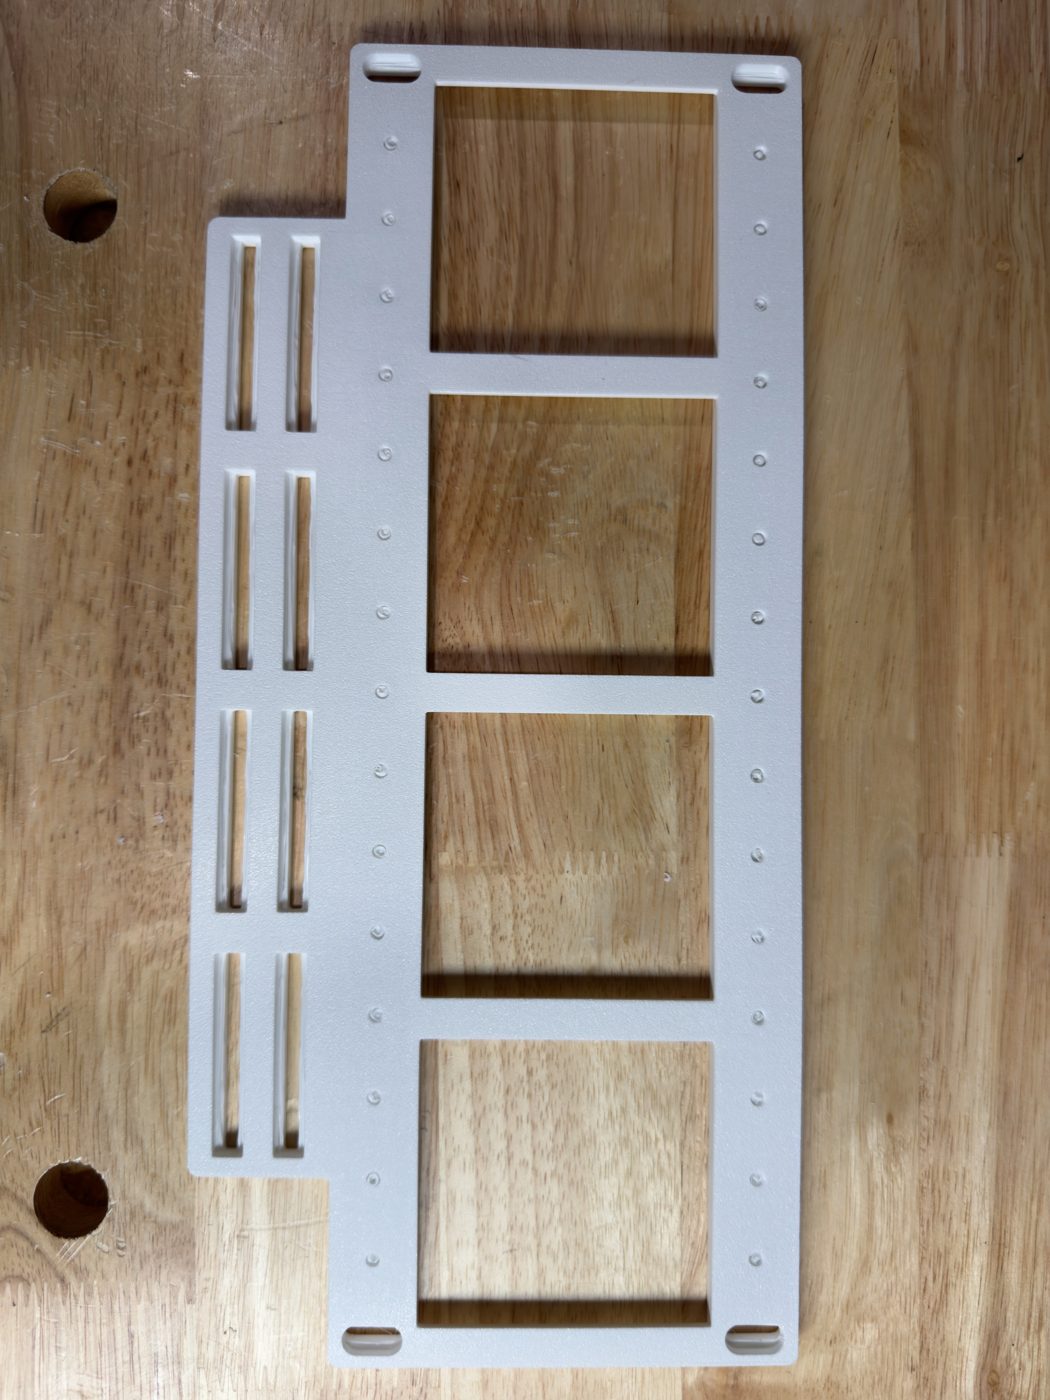
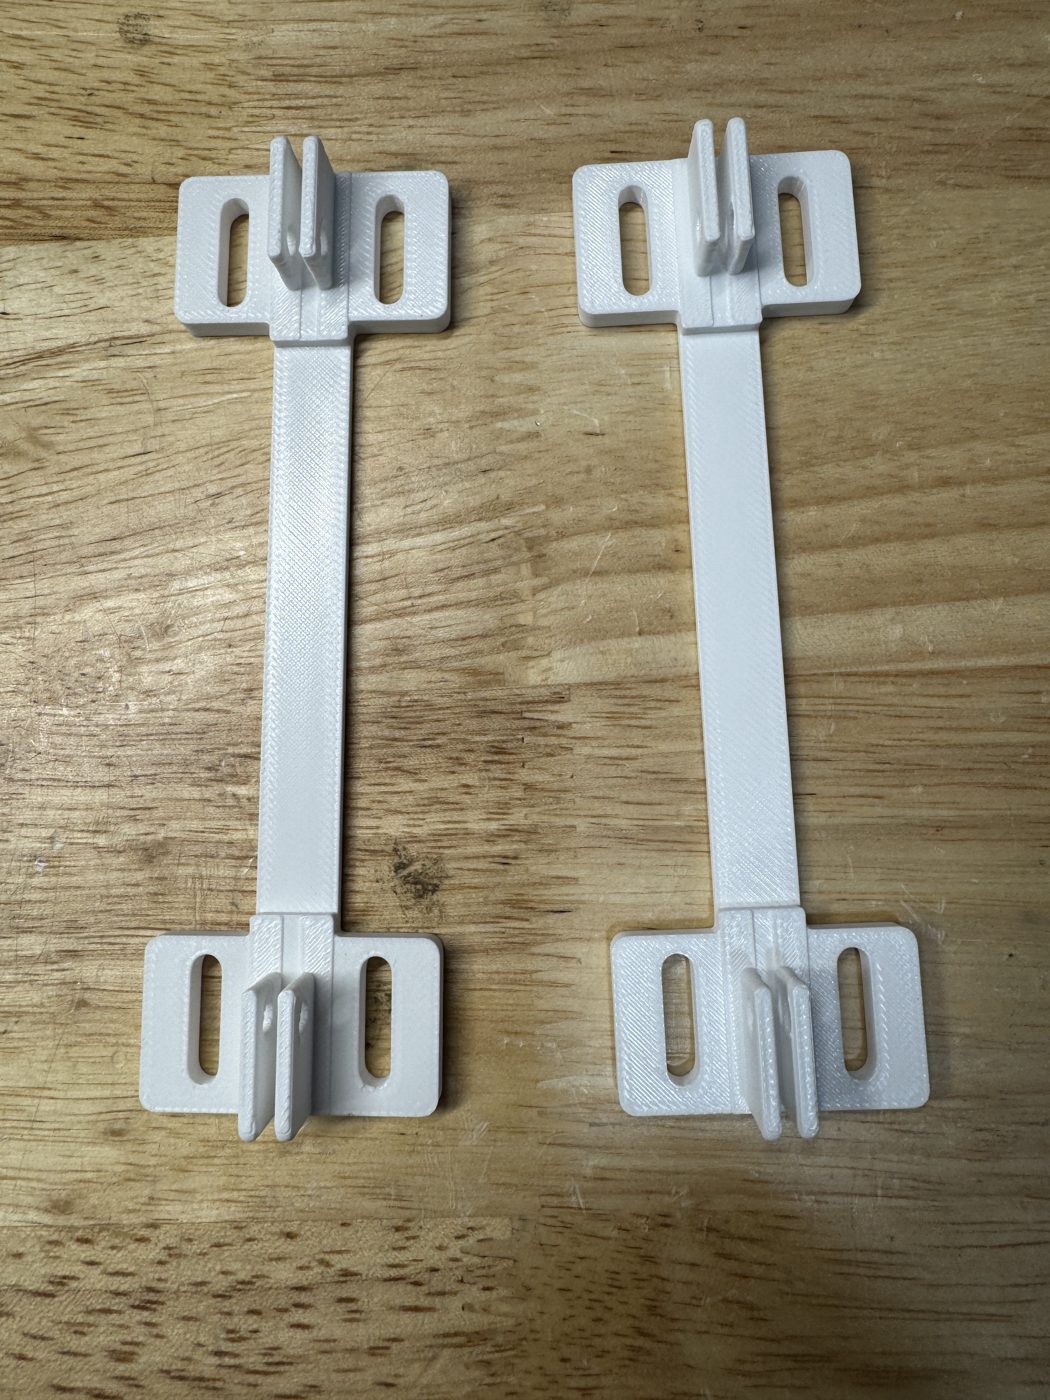
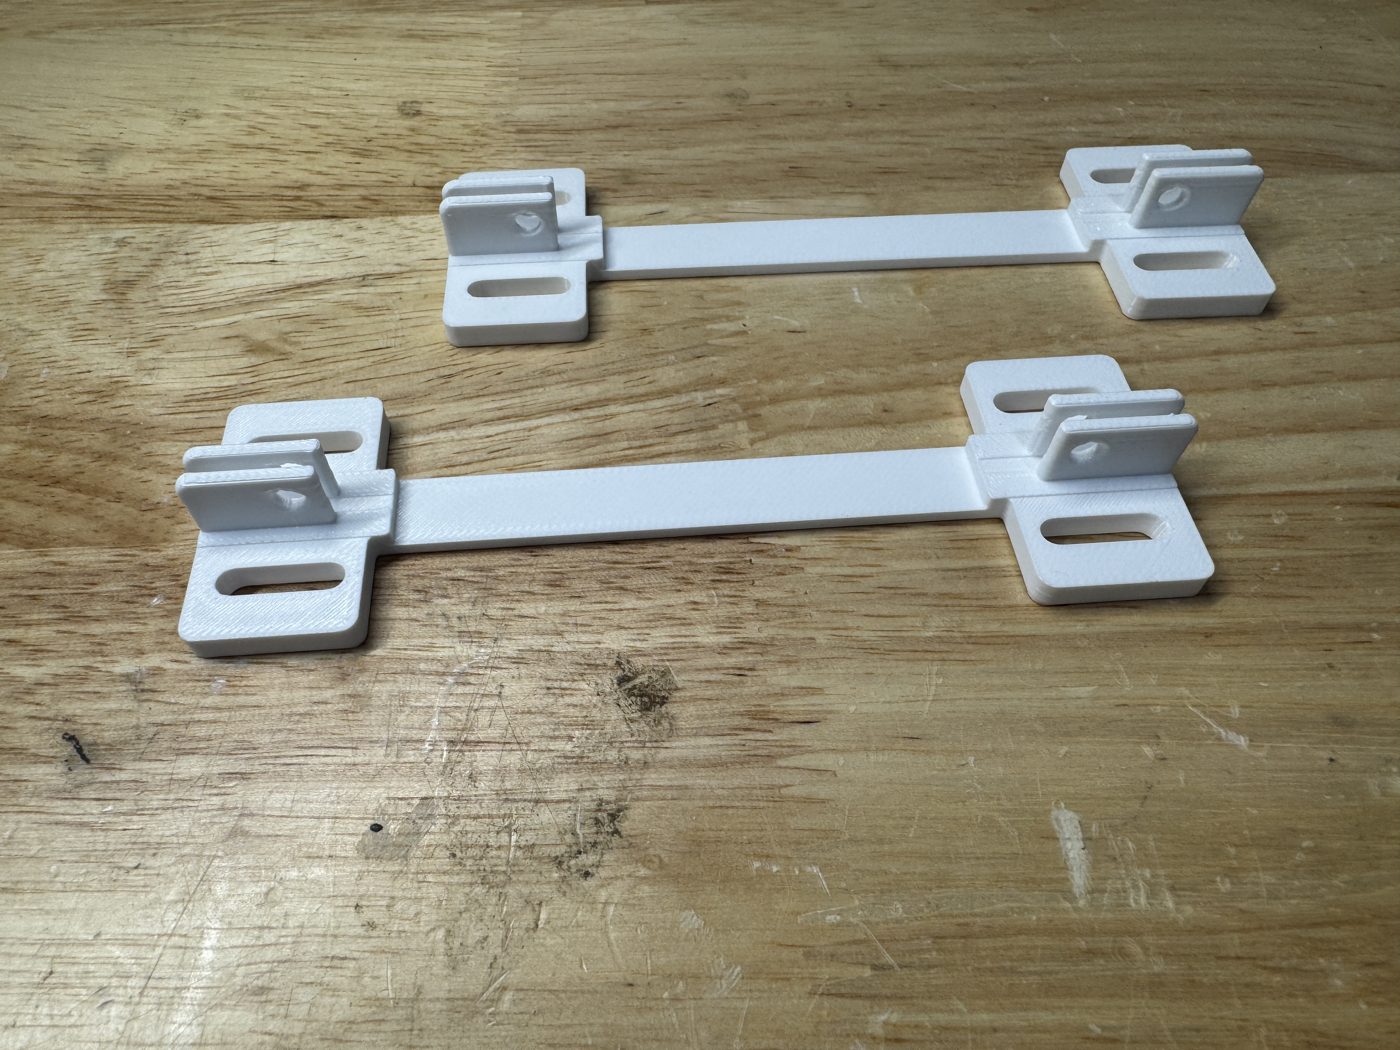
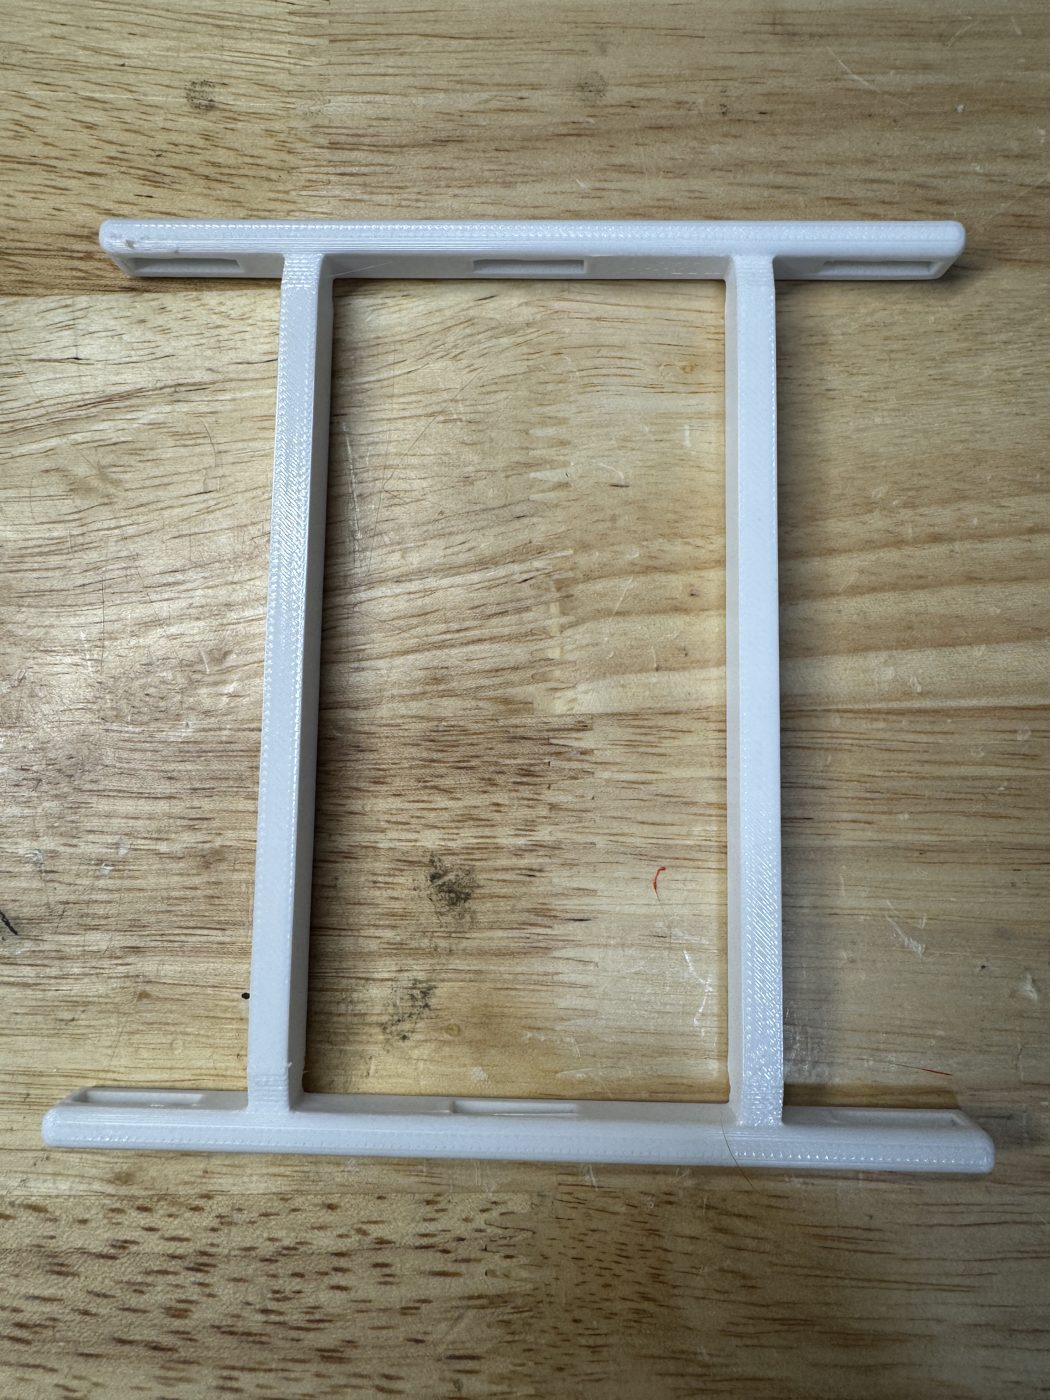
Chassis installed in the case, radio running (top panel off)Fully assembled chassis out of the caseRadio turned over: lining up the outside bolts with the case holesBase plate with side extension, topBase plate, undersidePCB mounts, from abovePCB mounts, from the sideChassis handleBPF toroid retainers: bottom tray (6–20 m) left, top tray (30–160 m) rightBPF toroid retainers, side viewBPF toroid retainers, edge viewDisplay shield: printed shield, outsideDisplay shield: printed shield, insideDisplay shield: covered in copper tape and mounted over the displayDisplay shield: installed; the green wire grounds the copper tape to the chassisSecondary CPU: Pi display, T41, iPhone and laptop all running Mustang 2Secondary CPU: web remote, Pi Touch Display 2 and T41 all running Mustang 2Secondary CPU: the web remote in a browserSecondary CPU: Menu in the web remoteSecondary CPU: Mustang Mobile phone page with touch slidersSecondary CPU: phone page – Menu → DisplaySecondary CPU: phone page – Band as a native iPhone pickerSecondary CPU: phone page – Course Inc tuning stepSecondary CPU: Mustang 2 on the Pi Touch Display 2Secondary CPU: Menu with cascading submenuSecondary CPU: UART wires on the T41 main boardSecondary CPU: UART wires on the Pi 5 GPIO header
I built this chassis system to solve a few problems I encountered. I have the metal case from Justin (AI6YM Store — T41-EP SDT), and I wanted an easier way to connect all the ribbon cables, power cables, RF cables, etc. Placing the PCBs in the case and then trying to connect everything was a nightmare, and having to pull the PCBs out for troubleshooting was cumbersome.
Once the PCBs and all the cabling are attached, removing or inserting the chassis requires (in my case) connecting or disconnecting the main power from the power distribution, the RF cables from the 20 W PA, the USB connection on the Teensy, the case fan from the power distribution, and the display and front panel cables — a total of 6 connections. Once that’s done, I can place the chassis into or remove it from the case. It only takes a minute and it’s ready to go. With the handles in place, it still has about 10 mm of clearance when the top panel is on.
This also makes troubleshooting much easier: I can place the chassis outside the case, connect the power, display, front panel, etc., and have access to all the PCBs at once, from all sides.
PCB Mount
The PCB mount can be used with or without the main chassis base plate.
PCB mounts, from abovePCB mounts, from the side
Chassis Base System
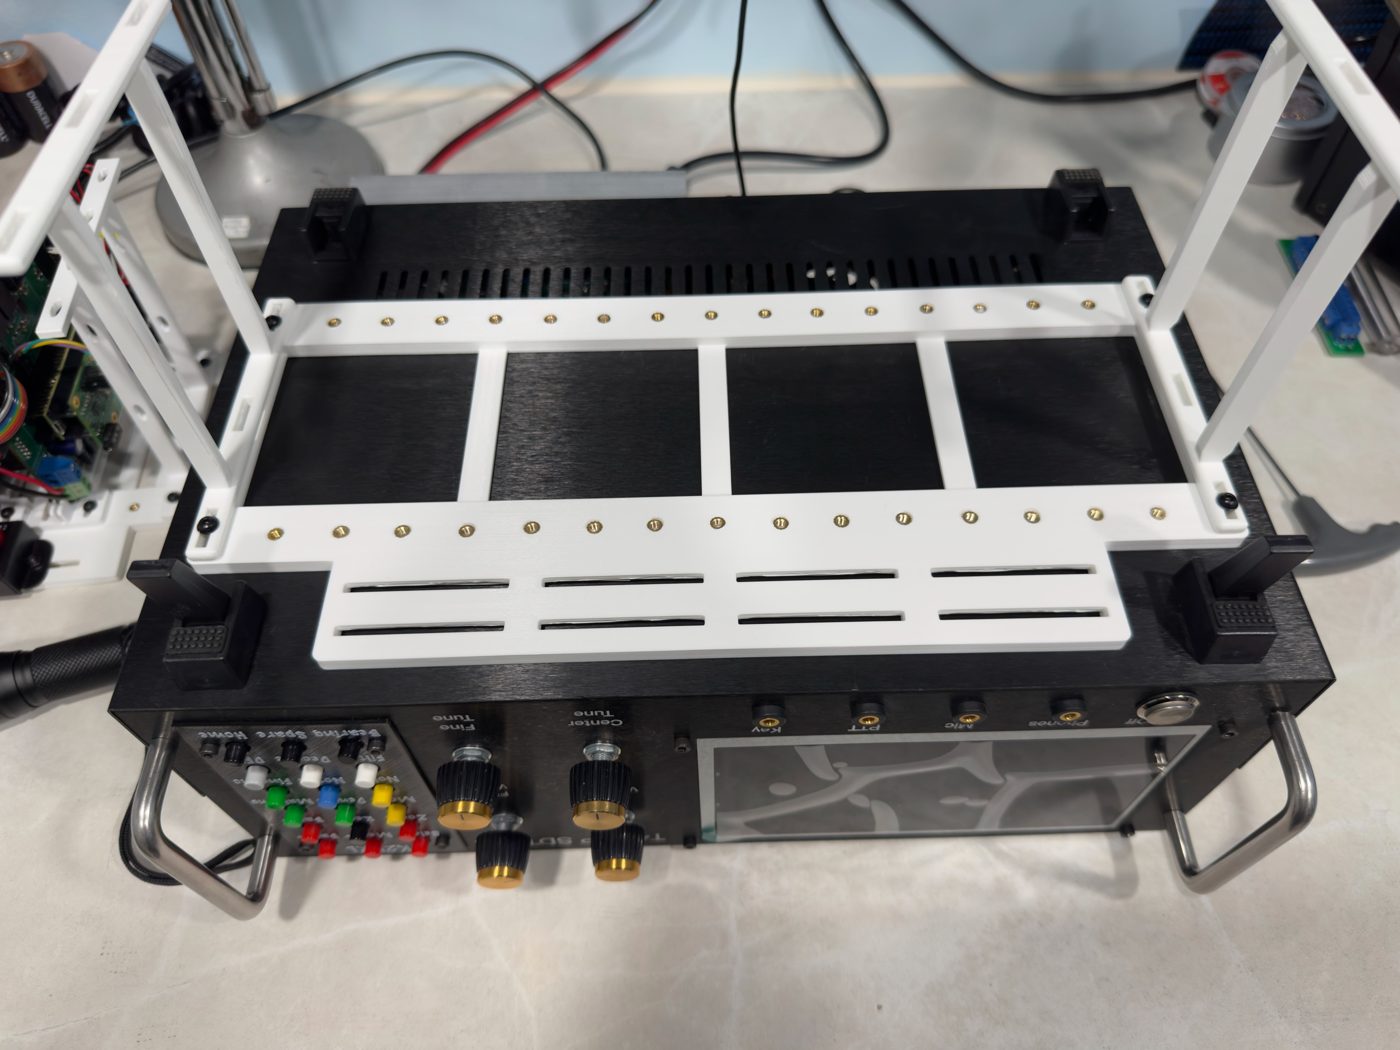
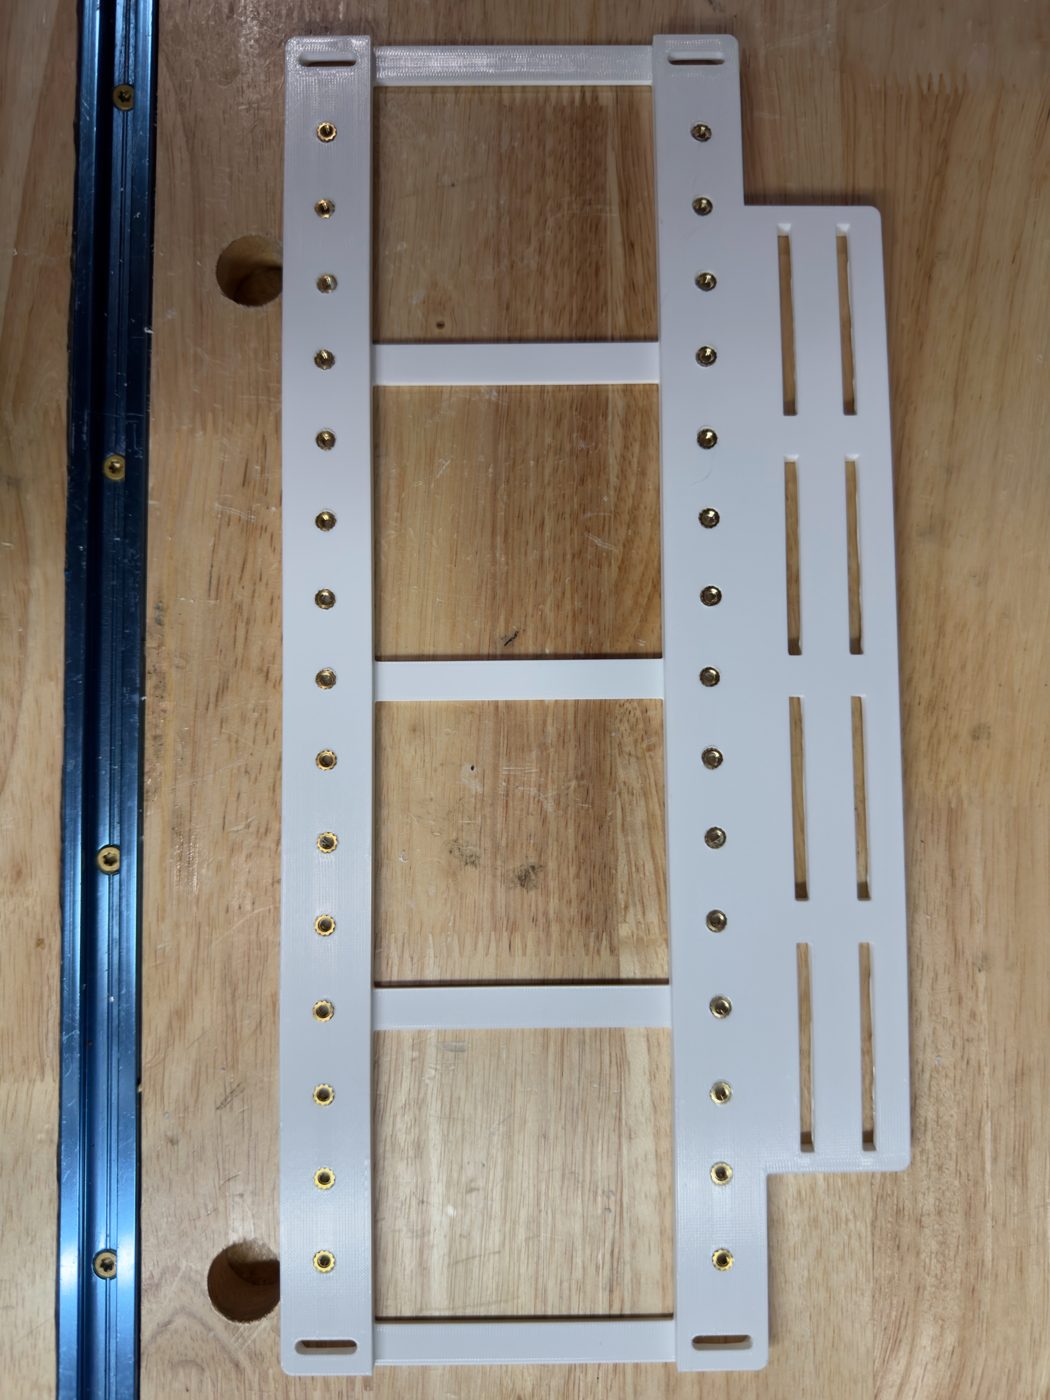
The chassis base plate comes in two versions: one with a side extension that you can attach a power distribution board (or anything else) to, and one without it, for cases that are too narrow for the extension.
The PCB mounts and handles attach to the base plate with 3 mm bolts and washers. The handles are optional, but they make it much easier to lift the chassis system in and out of the case.
Use longer bolts in the outside slots — long enough to pass through the handles or PCB mounts and reach through the case. On the bottom, the outside slots are recessed so the washers and nuts sit in place without raising the chassis base system off the case once it’s installed.
In the “radio turned over” photo, the radio is upside down so I can adjust the outside bolts to line them up with the holes in the case. I used wing nuts on the bottom to make the chassis base system easier to remove.
Base plate with side extension, topBase plate, undersideFully assembled chassis out of the case, power distribution on the side extensionRadio turned over: lining up the outside bolts with the case holesChassis installed in the case, radio running (top panel off)
Chassis Handles
The chassis handles make it much easier to move the system in and out of the case. You can also use them to tie-wrap loose cables and wiring.
Chassis handle
Parts list
I printed the parts in PETG, but I’m sure PLA will also work, as the radio doesn’t get that hot. If the parts are too long for your printer, use your slicer to cut them with connectors.
Printed parts
PETG (PLA should also work), 0.4 mm nozzle, basic filament settings — nothing special
Threaded inserts
M3 × 4 × 5 metric threaded inserts
PCB mounts
3 mm × 8 mm bolts with washers
Chassis to case
3 mm × 16 mm bolts with washers and wing nuts, in the four corners
Downloads
3D-printable files for the chassis parts. Print settings and hardware are in the Parts list above.
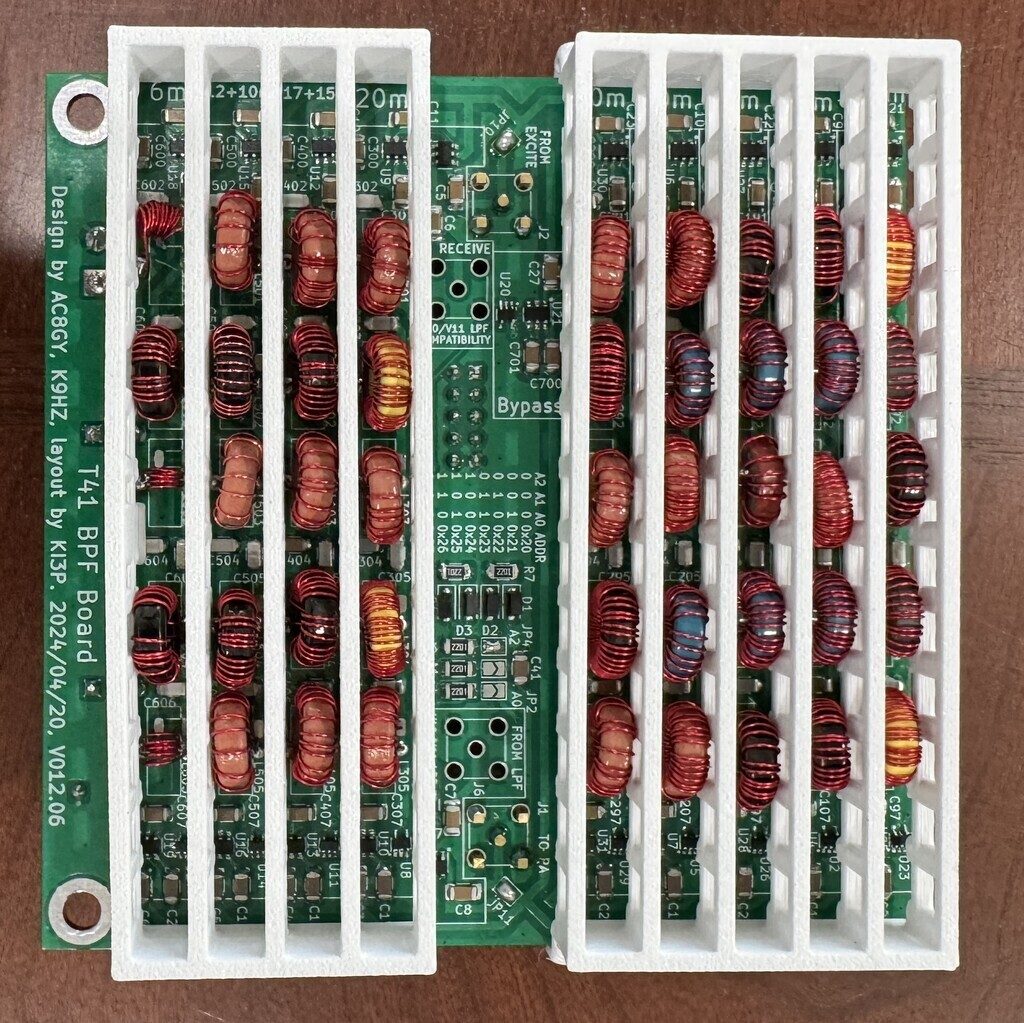
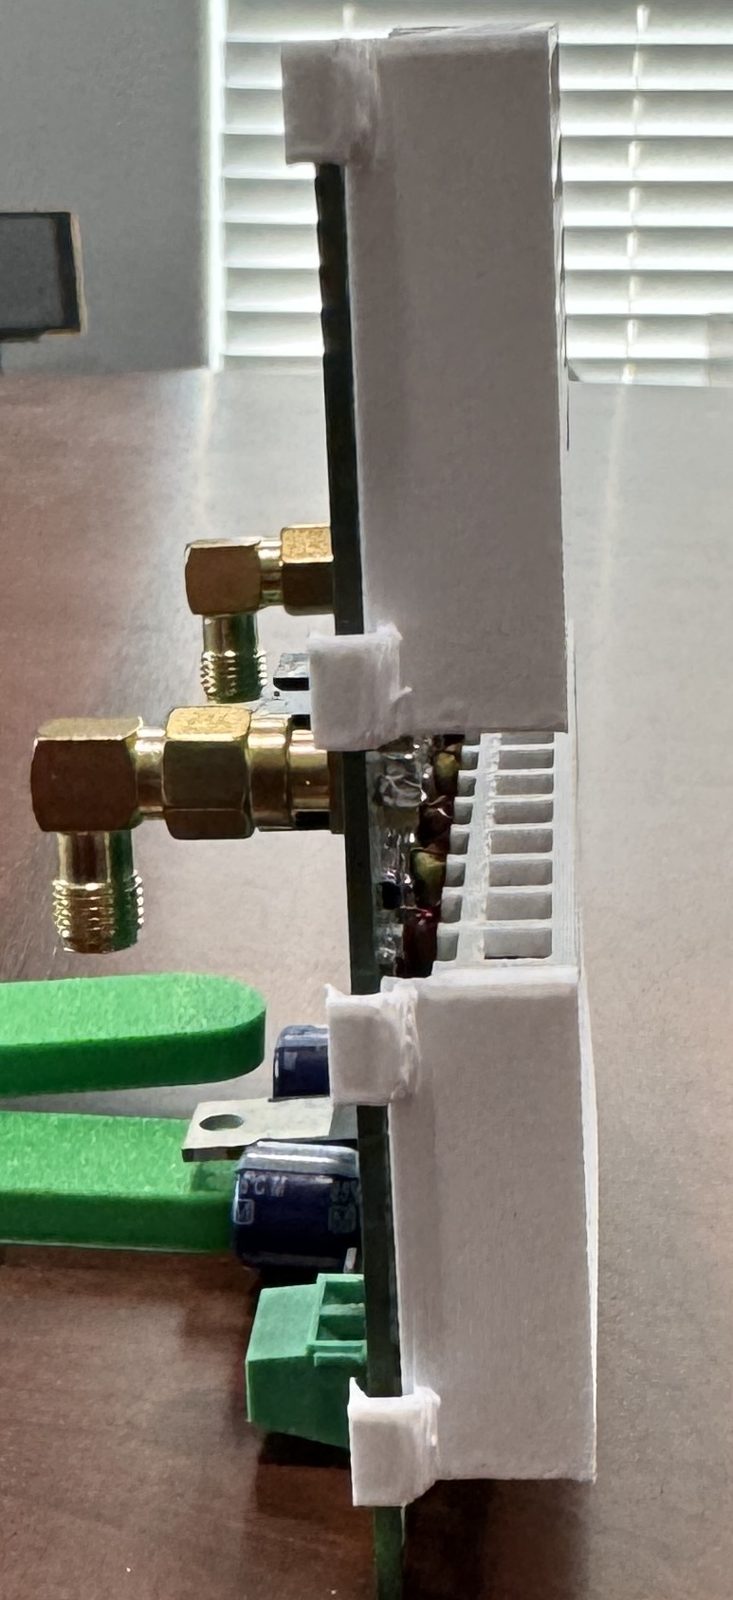
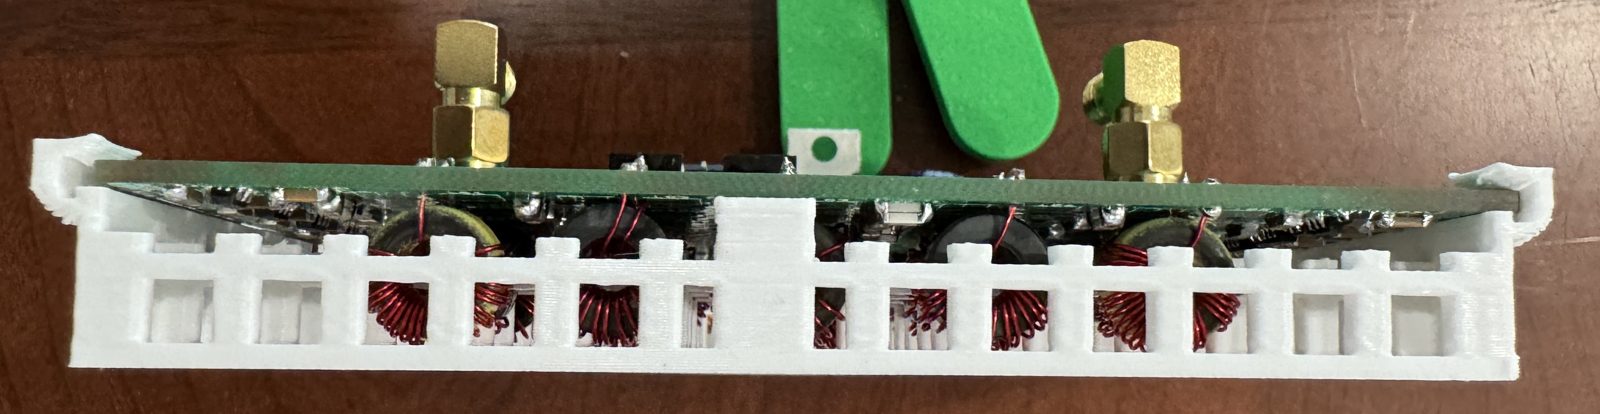
A two-piece 3D-printed retainer, a bottom tray and a top tray, for the toroids on the band-pass filter (BPF) board.
Overview
I wanted to make sure that when working in the radio I didn’t bump or move the toroids, and also to have a way to re-tune or replace them.
Photos
Both retainers fitted on the T41 BPF board: bottom tray (6–20 m) on the left, top tray (30–160 m) on the rightSide view: the trays clip onto the boardEdge view: toroids held in the tray, visible through the openings
Printing
I printed them in PETG, but PLA will also work. I used a 0.4 mm nozzle and standard printer settings.
Downloads
3D-printable files for the two trays. The top tray covers the 30–160 m toroids and the bottom tray the 6–20 m toroids.
A 3D-printed shield for the video display, covered in copper tape and grounded to the chassis.
Overview
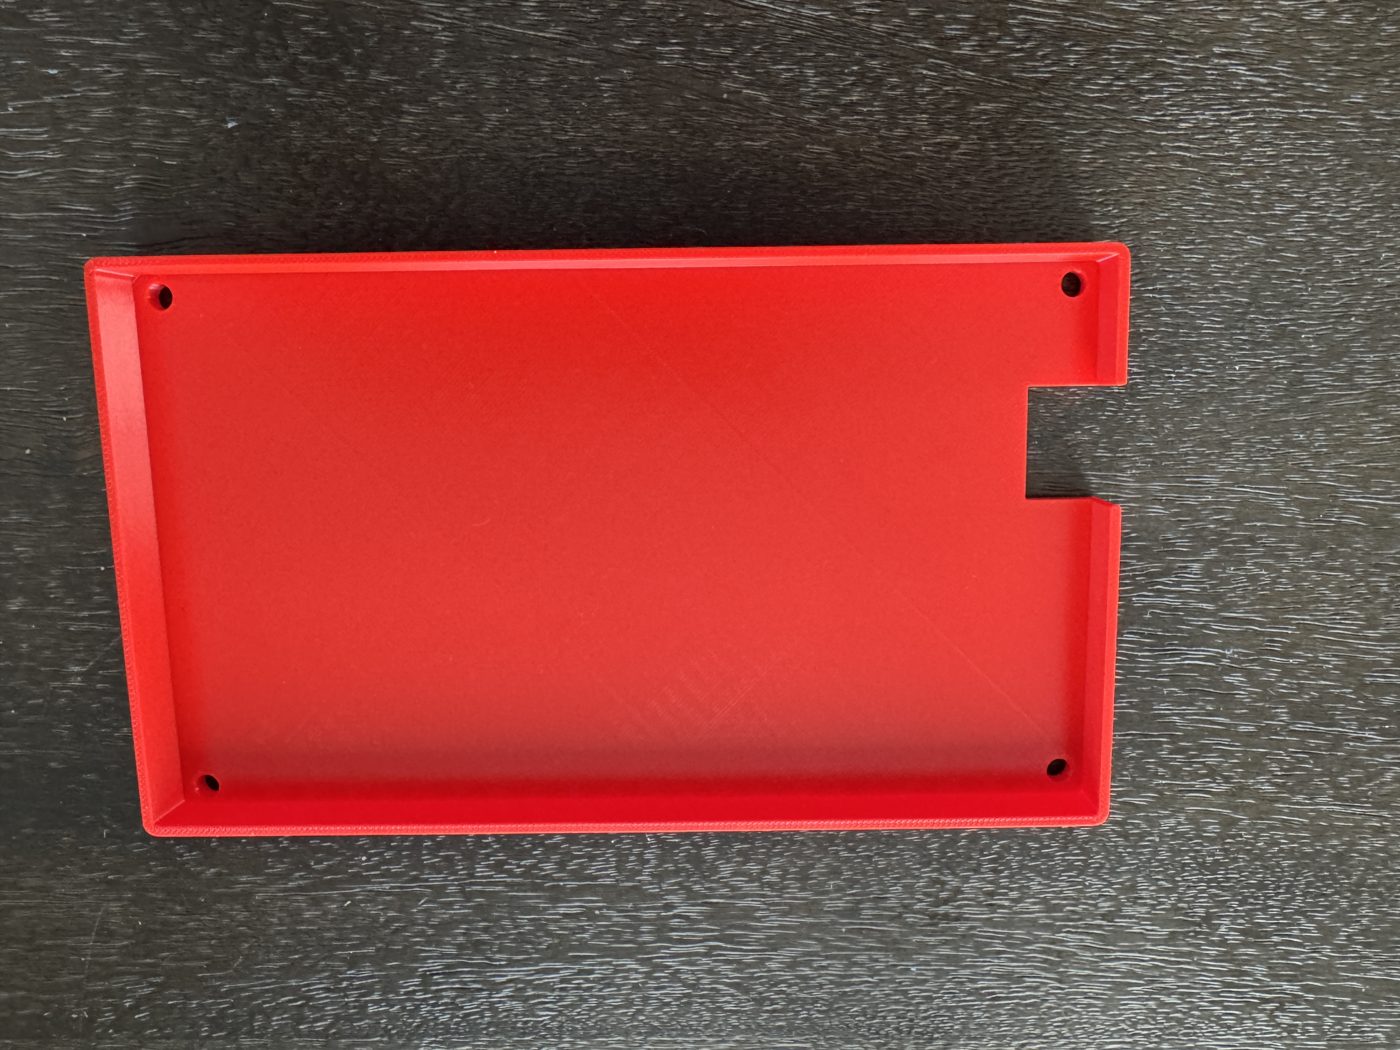
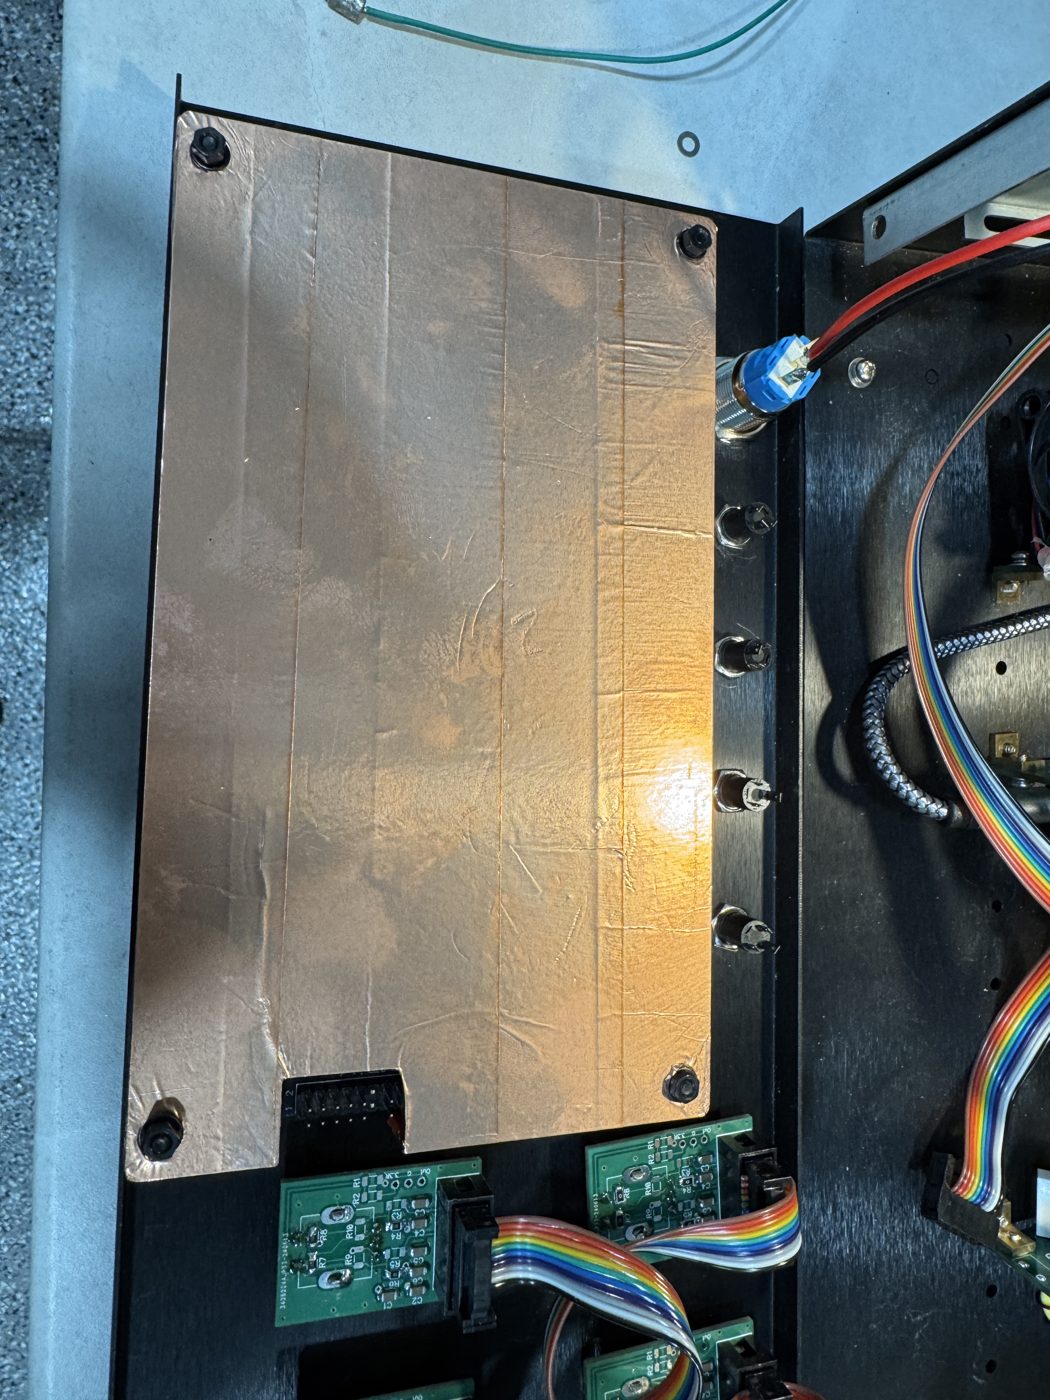
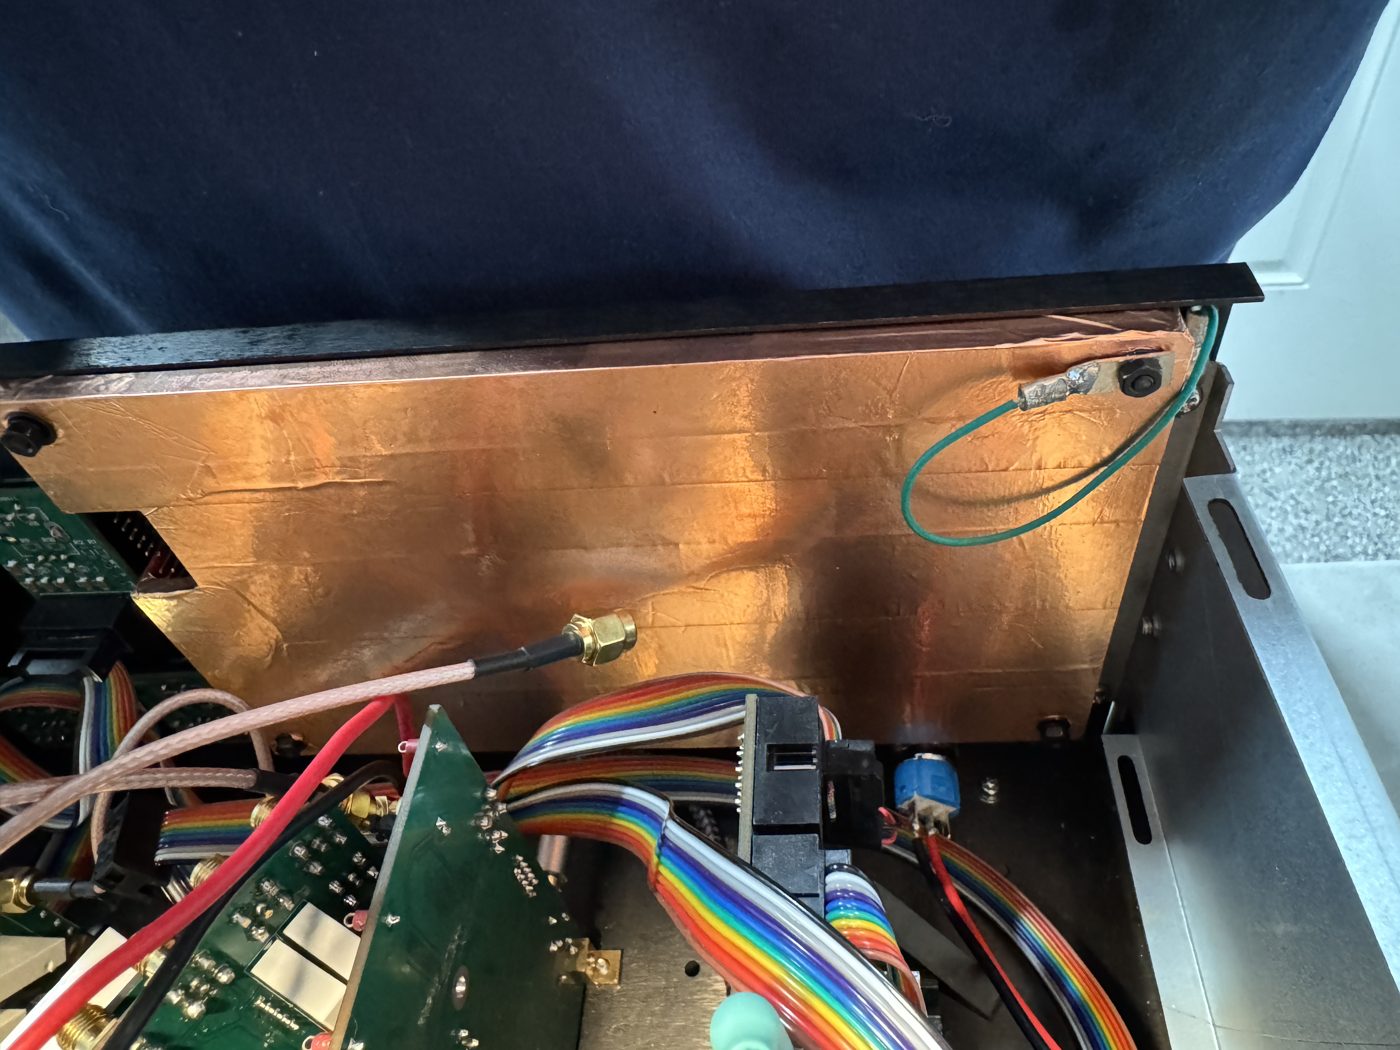
This is a 3D-printed shield for the video display. I covered it with copper tape and grounded it to the chassis. This cut down on the noise considerably.
Photos
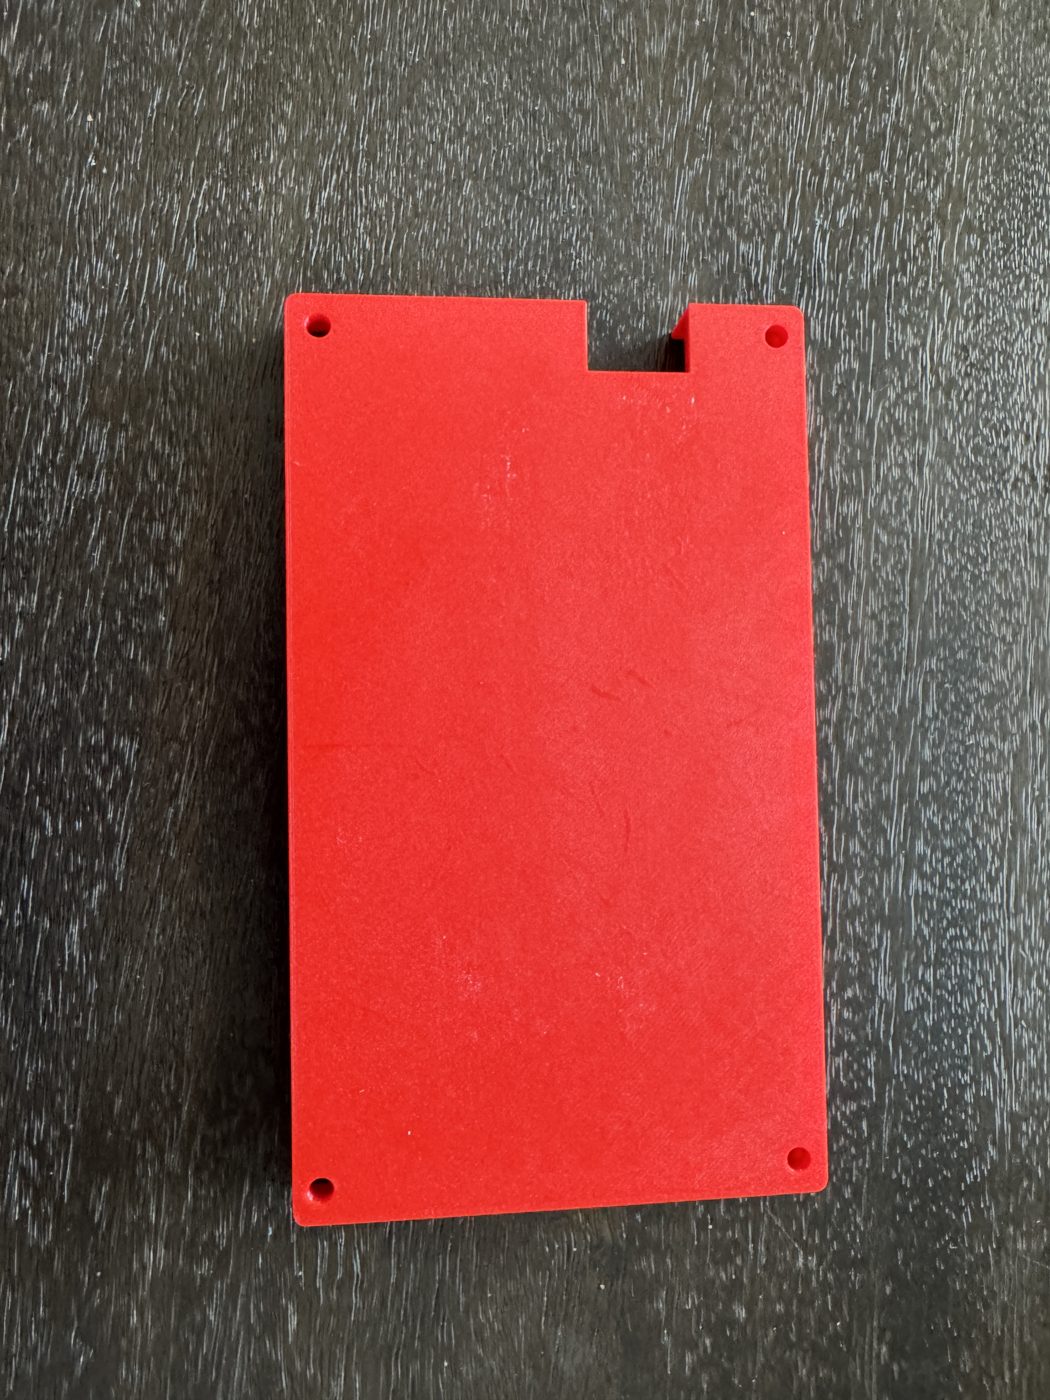
Printed shield, outsidePrinted shield, insideCovered in copper tape and mounted over the displayInstalled; the green wire grounds the copper tape to the chassis
Mounting
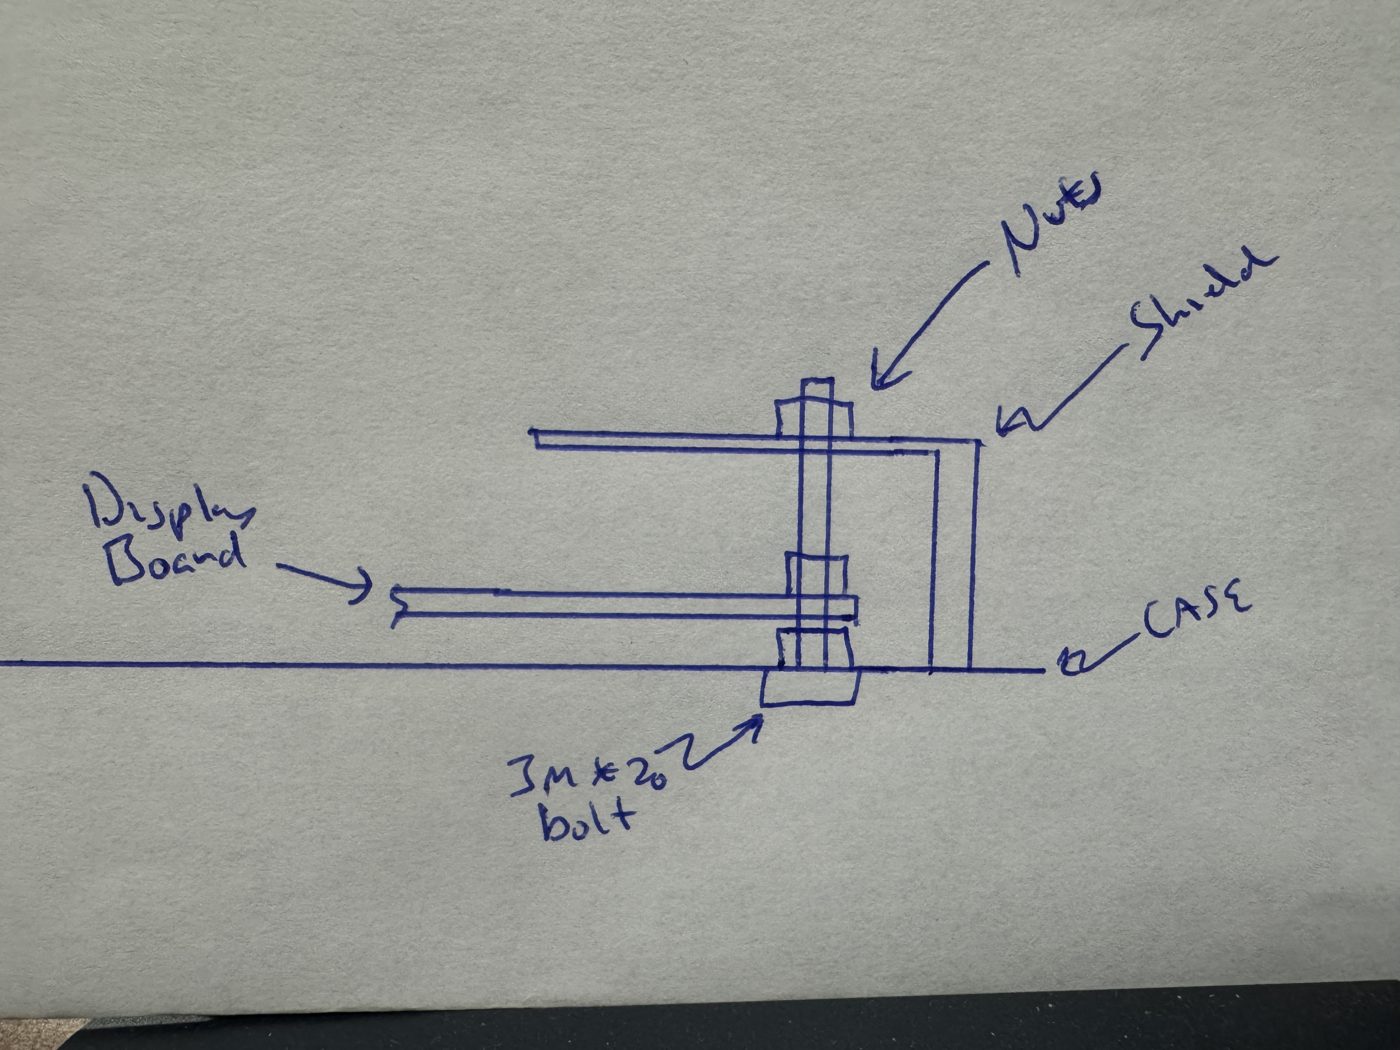
The shield mounts on 3 mm × 20 mm bolts that come up through the case: nuts hold the display board, and the shield sits above it, held by another nut.
Hardware: 3 mm × 20 mm bolts, nuts and washers.
Mounting sketch: 3 mm × 20 mm bolt through the case, with nuts holding the display board and the shield
Downloads
3D-printable file for the shield. Cover it with copper tape and ground it to the chassis after printing.
Hardware · software · Mustang 2 V1.0.34 · as of 4 Oct 2026
Secondary CPU
A Raspberry Pi 5 added alongside the Teensy 4.1 to drive the graphics on a Raspberry Pi Touch Display 2, now with a mouse-driven toolbar and a browser remote, with live audio, on the home network.
Overview
This project is to add a secondary CPU, in this case a Raspberry Pi 5, to handle all the graphics to the Raspberry Pi Touch Display 2 screen. Future additions to this will be changing to dropdown menus using a mouse and also a remote control website.
Status
RunningStill growing
The Pi 5 and Teensy are talking on the bench, running Mustang 2 V1.0.34. The Pi’s screen mirrors every pane of the Teensy’s own display, the toolbar dropdowns and mouse wheel control the radio, and a browser on the home network, including a phone, can see it, control it and play its receive audio. Every Calibration screen, the Audio Equalizer and the I2C BIT test now work from the Pi and the remotes too, and in CW the decoded text and the CW settings page show there as well. Next up is digital modes (FT8 / WSJT-X) over the same USB audio link.
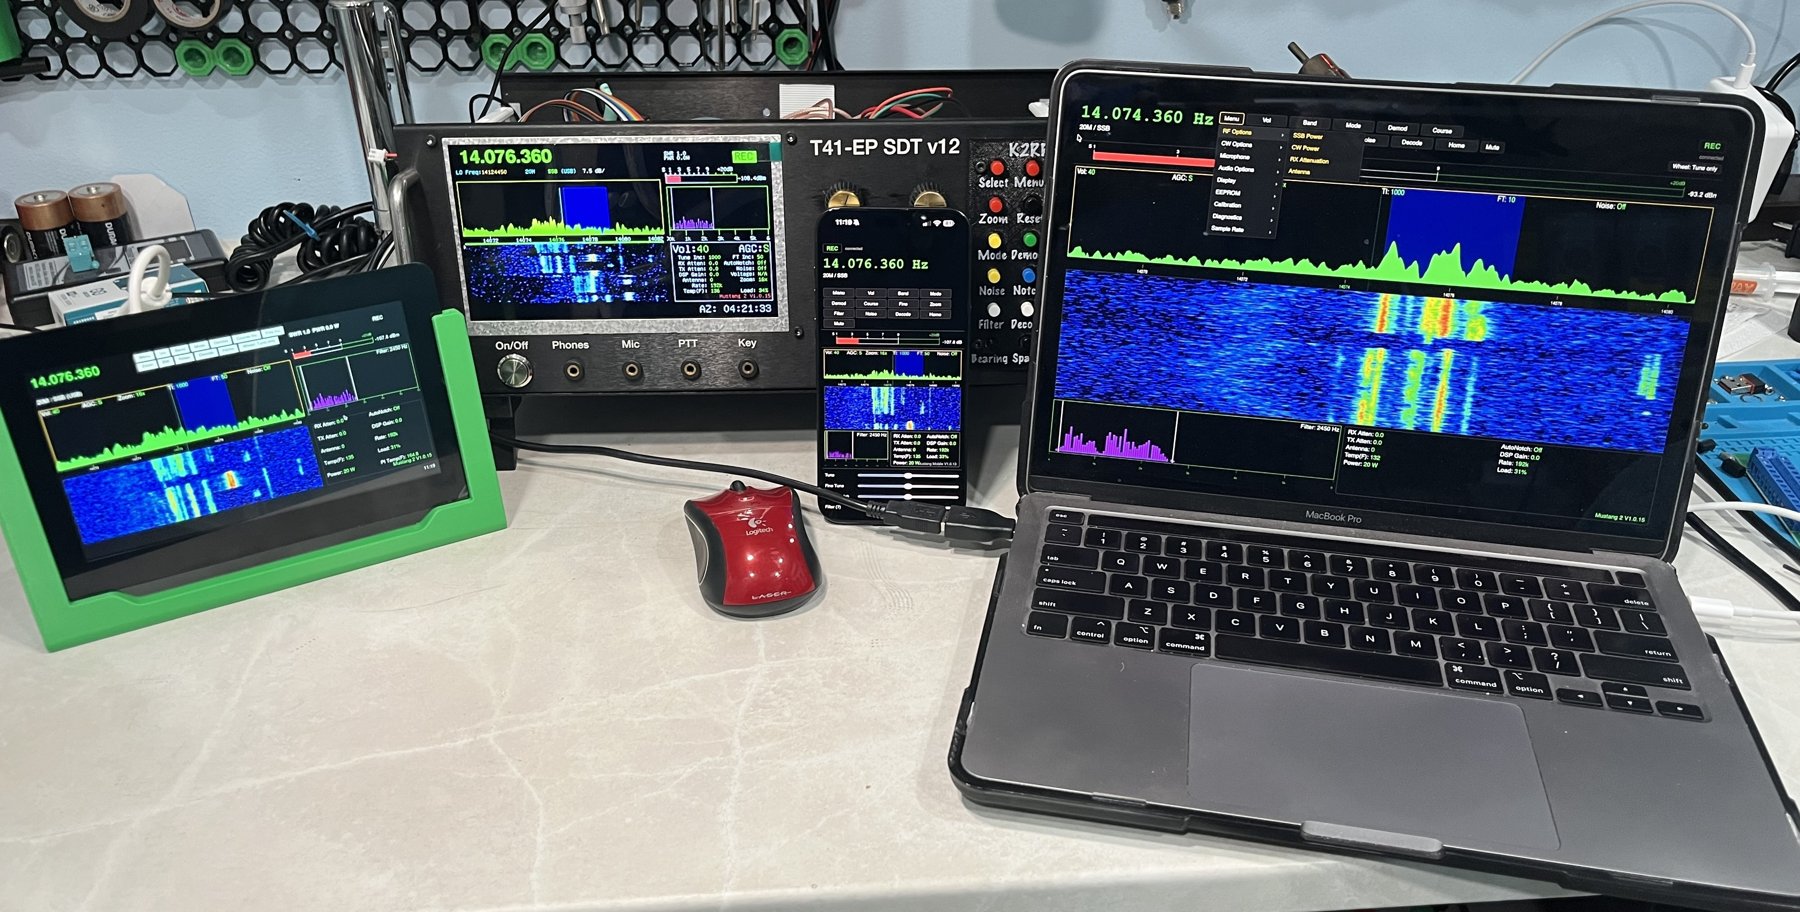
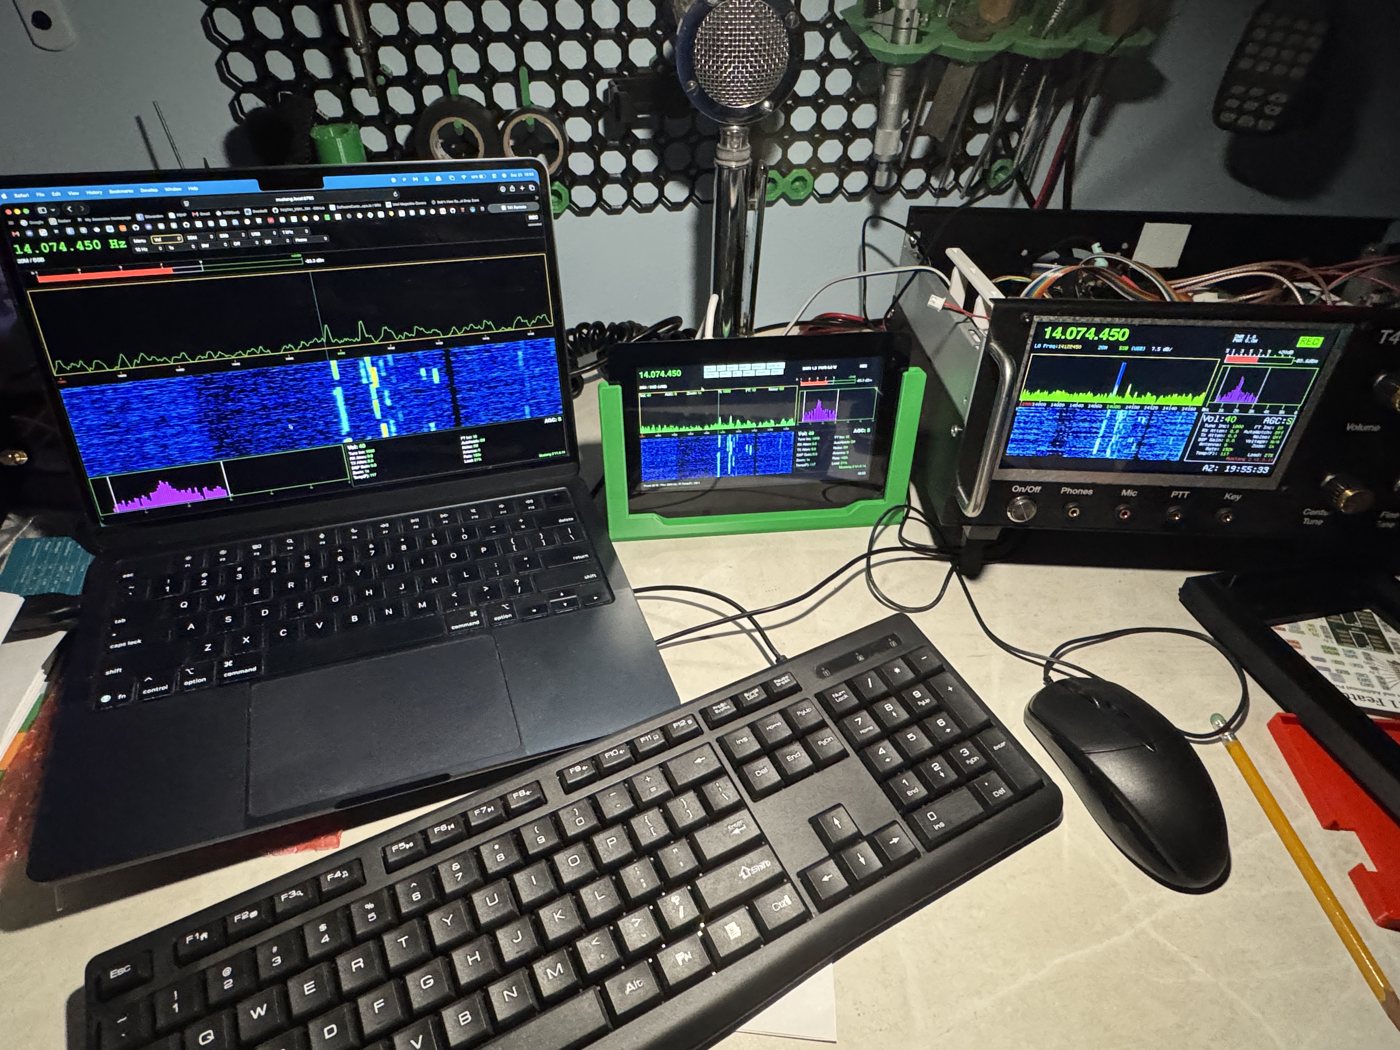
All four running Mustang 2 together: the Pi 5 on the Touch Display 2 (left), the T41’s own screen (back), the phone page on an iPhone (center) and the web remote on a laptop (right)
How it works
The Teensy 4.1 keeps doing everything it does today: all the real-time audio, DSP and RF control. The Pi 5 only draws the screen and handles the mouse. The two boards talk over a simple serial (UART) link called PiLink: the Teensy sends frequency, mode, settings, S-meter and spectrum data down to the Pi, and the Pi sends clicks and wheel turns back up as ordinary front-panel button presses and knob turns.
The Pi is an add-on, not a dependency. The physical front panel (buttons, encoders, key, PTT) stays wired straight to the Teensy. If the Pi is unplugged or crashes, the radio keeps working exactly as it does now.
powerdata / video
What it does
On the Pi’s own screen
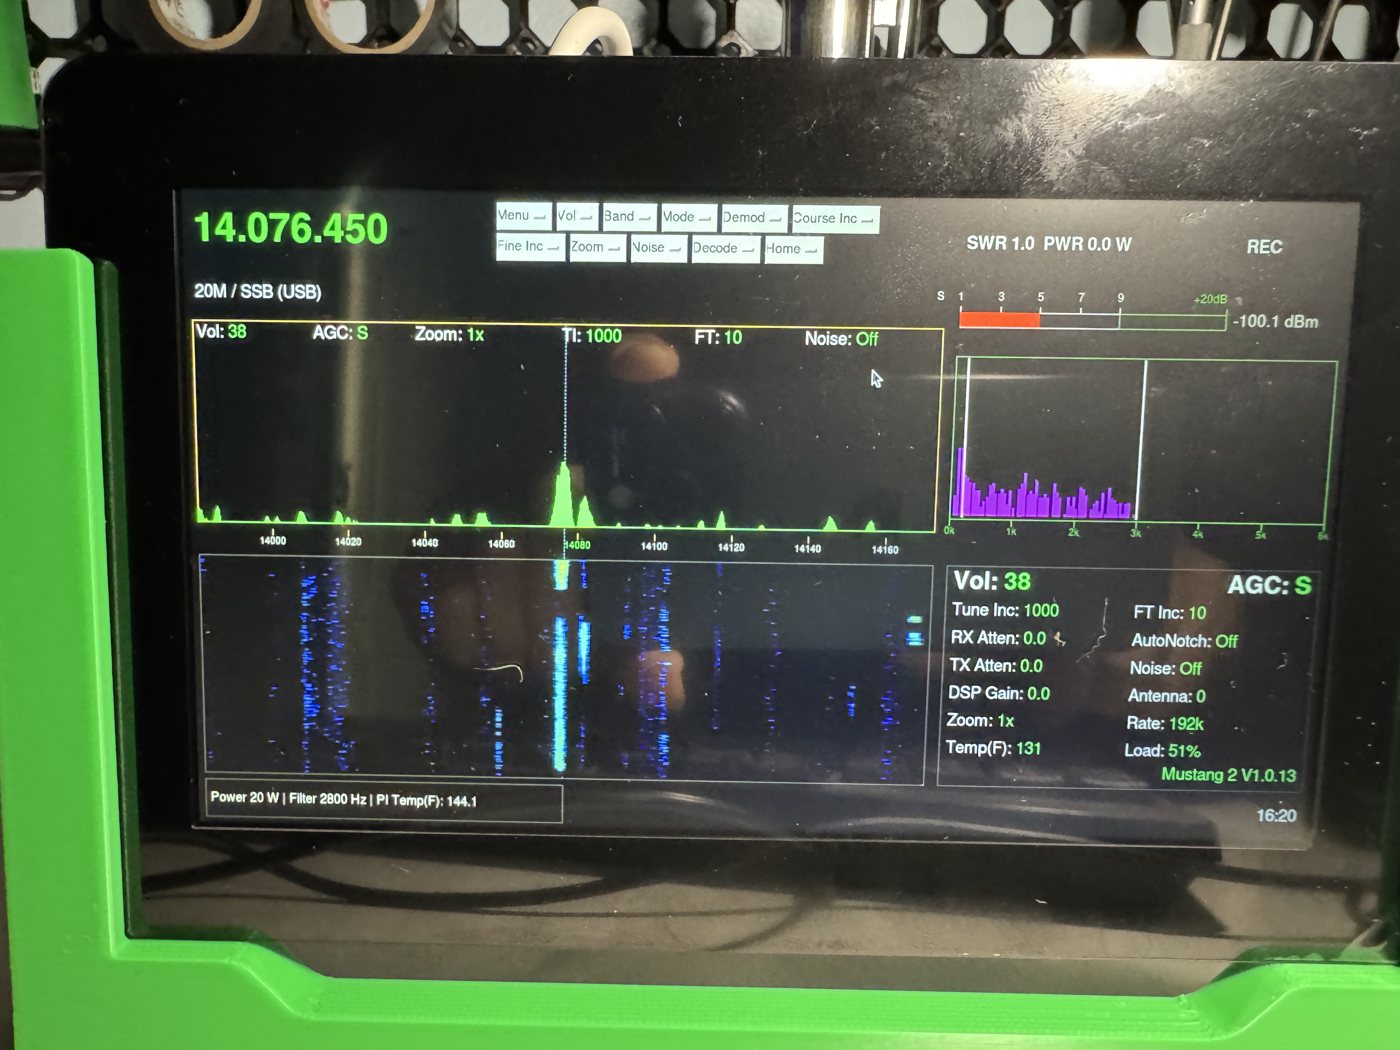
A full mirror of the Teensy’s display in the same layout, scaled from 800×480 to 1280×720: VFO, frequency/band/mode, spectrum and waterfall (with the Teensy’s own colors and frequency ruler), S-meter, REC/XMT, SWR/power, audio spectrum, the Settings pane and the clock badge. When the front panel switches to the secondary (“Toggle Layout”) screen, the Pi follows.
Toolbar dropdowns, each built from the real firmware tables: Menu (with cascading flyouts, like a desktop app), Vol, Band, Mode, Demod, Course Inc, Fine Inc, Zoom, BW, Noise, Decode and Home.
The mouse wheel works the knobs. It adjusts a Menu setting while the red parameter box is showing (with a “Select >” to confirm, like the real SELECT button), or Volume/AGC/Mic/Sidetone or the filter after you pick them from the Vol or BW dropdown. A “Wheel:” indicator shows what the wheel controls; click it to hand the wheel back to tuning.
Blue filter highlight on the spectrum showing the receive passband, like the Teensy’s own tuning bar.
Desktop icons to start the radio app and to shut the Pi down cleanly (with a confirmation first).
Calibration and test screens: every Menu > Calibration item (S meter level, Frequency, Receive IQ, Transmit IQ, Power), the Audio Equalizer and Menu > Diagnostics > I2C BIT test open on the Pi and the remotes. The few Menu items without a Pi screen yet are greyed out there; they still work from the front panel. See the Mustang Reference for which ones.
CW: with Decode on, the decoded text runs along a line under the waterfall (green “CW” once locked, with the decoded WPM), and the Settings pane switches to the radio’s CW settings page, just like the T41.
Pi-only extras: a readout strip above the spectrum (Vol, AGC, Scale, Floor, Zoom, TI, FT, Noise), the Pi’s network address next to the clock, Menu > Display > Brightness for the touchscreen, and PI Spectrum Fill on/off for the Pi and remotes.
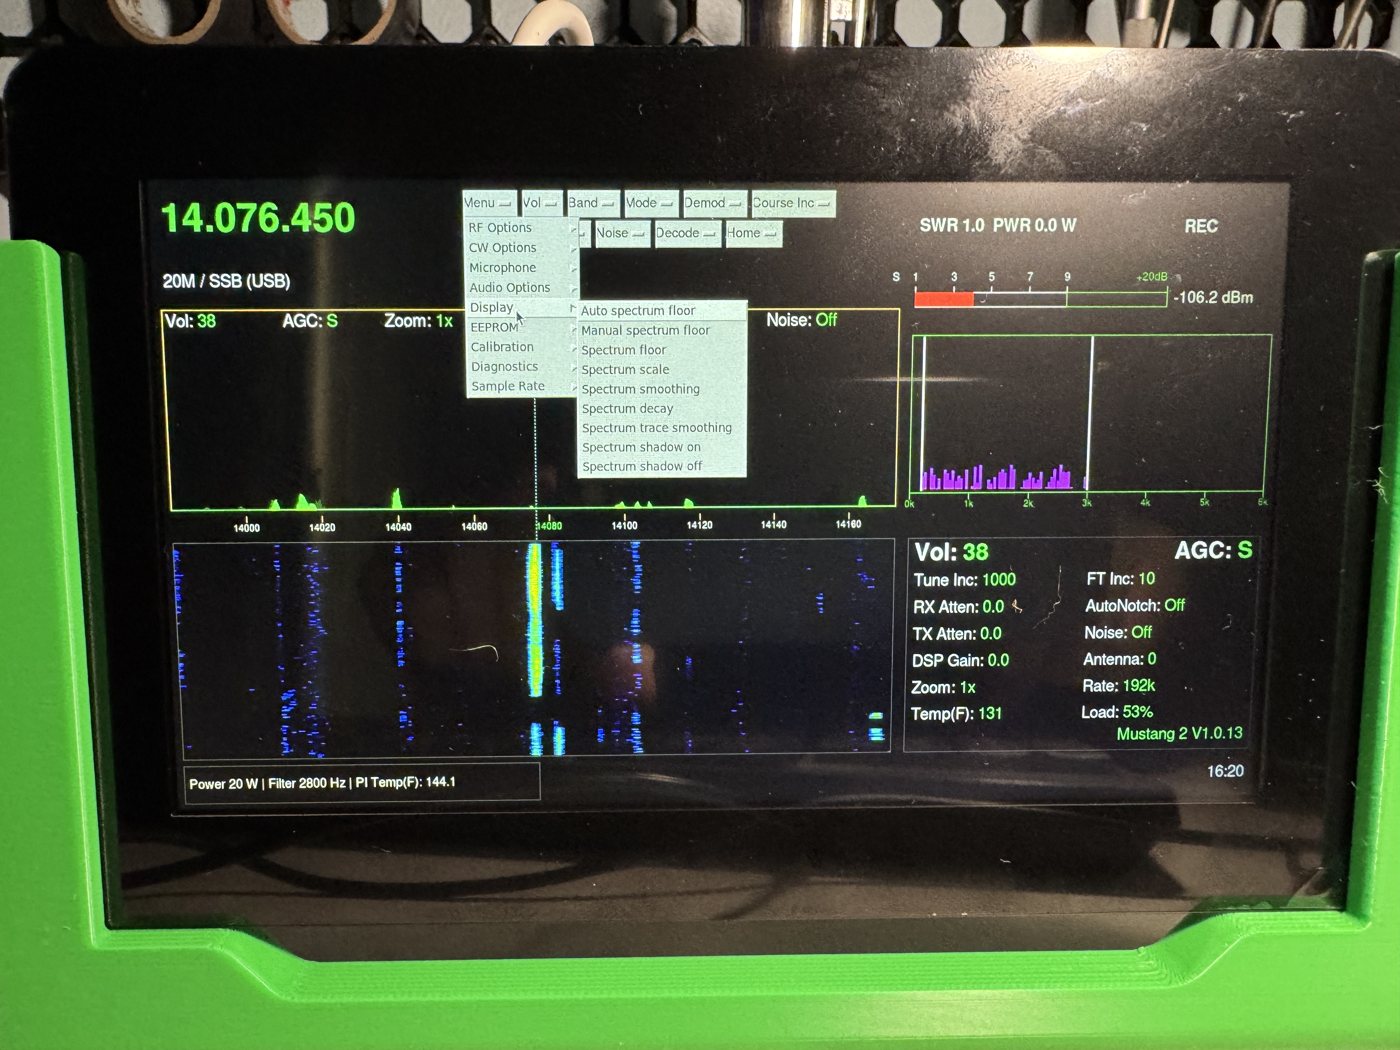
Mustang 2 running on the Pi Touch Display 2, tuned to 14.076.450 on 20 mChoosing from the Menu with the mouse: Display and its cascading submenu
From a browser on the home network
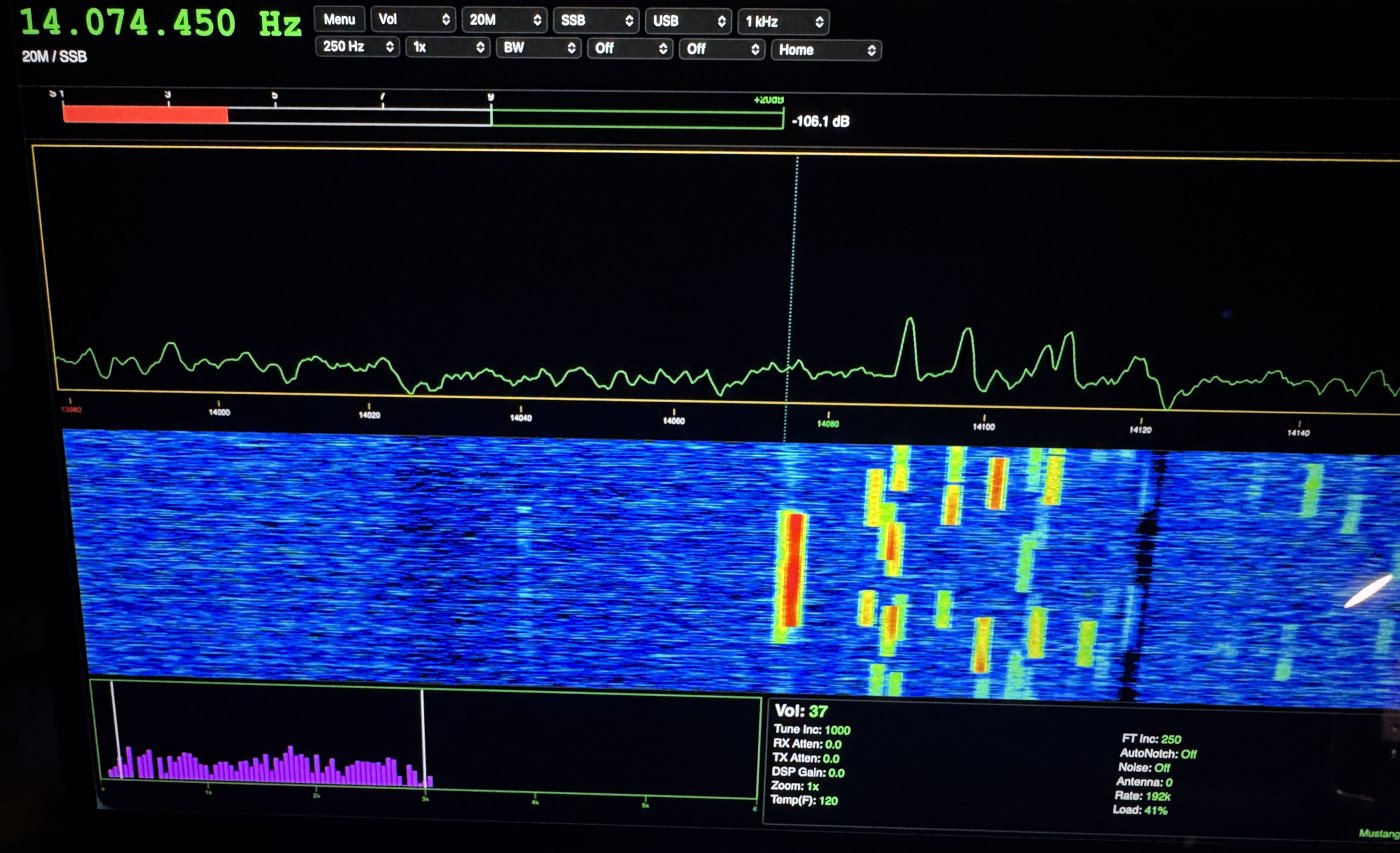
Open http://<pi-hostname>:8765/ on any computer on the same network. The page mirrors the VFO, toolbar, band/mode, REC/XMT, S-meter, spectrum and waterfall, audio spectrum, Settings pane and the Menu parameter box, and sends exactly the same commands the Pi’s own screen does.
Tune with the mouse wheel over the frequency or spectrum (hold Shift for fine tuning), or with a USB rotary encoder set up to send arrow or page keys.
Live receive audio plays in the browser, with a Mute button for that browser only. It comes from the Teensy’s own USB audio, over a USB cable to the Pi.
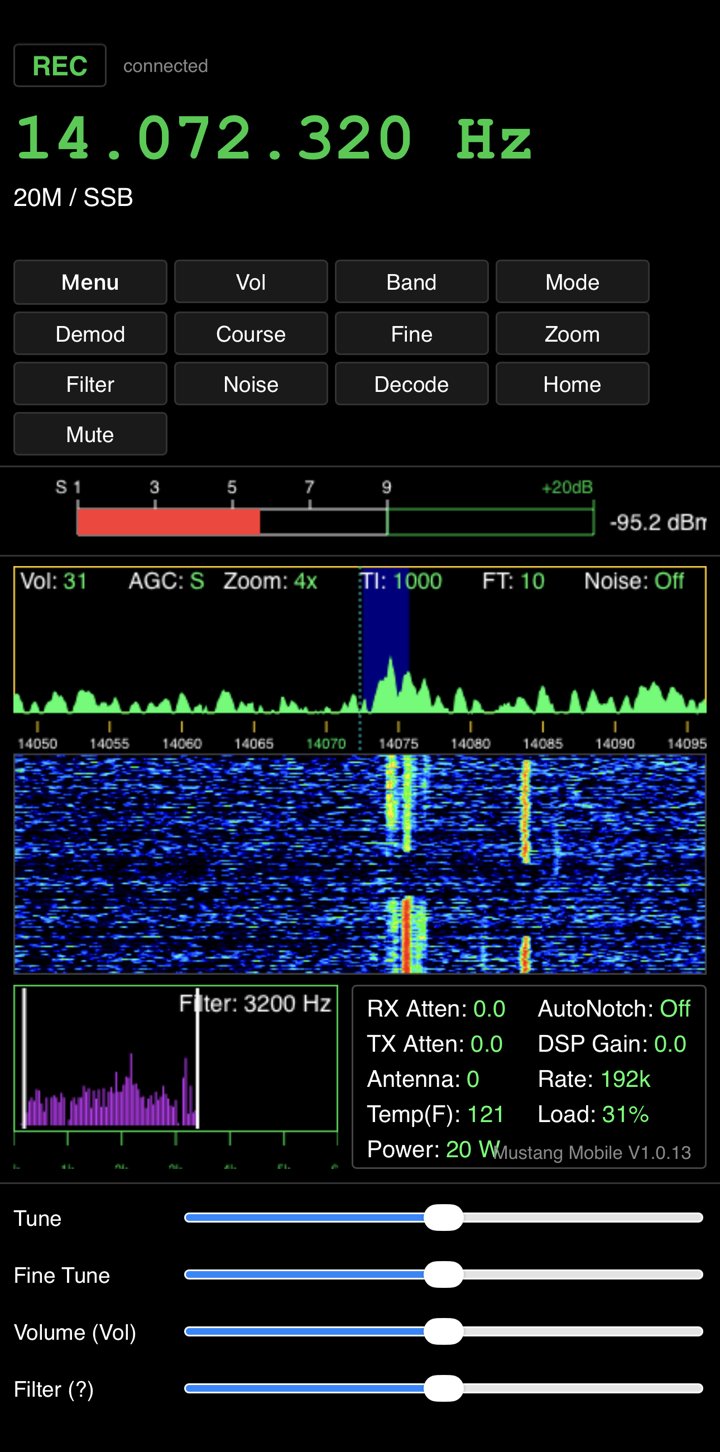
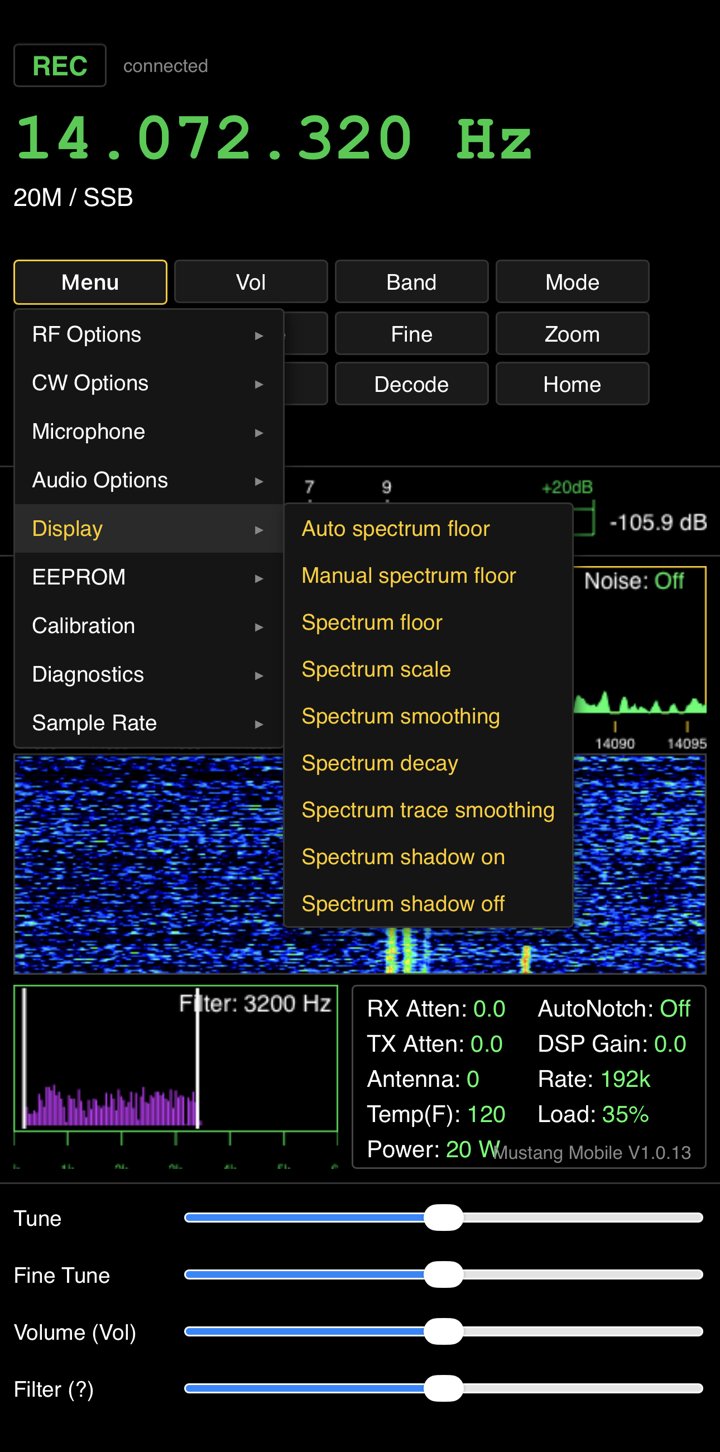
A phone page, Mustang Mobile, at http://<pi-hostname>:8765/mobile: the toolbar becomes a six-column grid of buttons that open as the phone’s own pickers, and four touch sliders at the bottom (Tune, Fine Tune, Volume and Filter) stand in for the mouse wheel. Drag a slider away from the center to turn that knob, further for faster; it springs back when you let go. The Volume and Filter labels show what they’re set to adjust (for example AGC, Lo Cut, or a Menu setting).
It asks for a passkey, which you set in config.py. Change it from the default.
For how to connect, what every control does and troubleshooting, see the Remote Access guide.
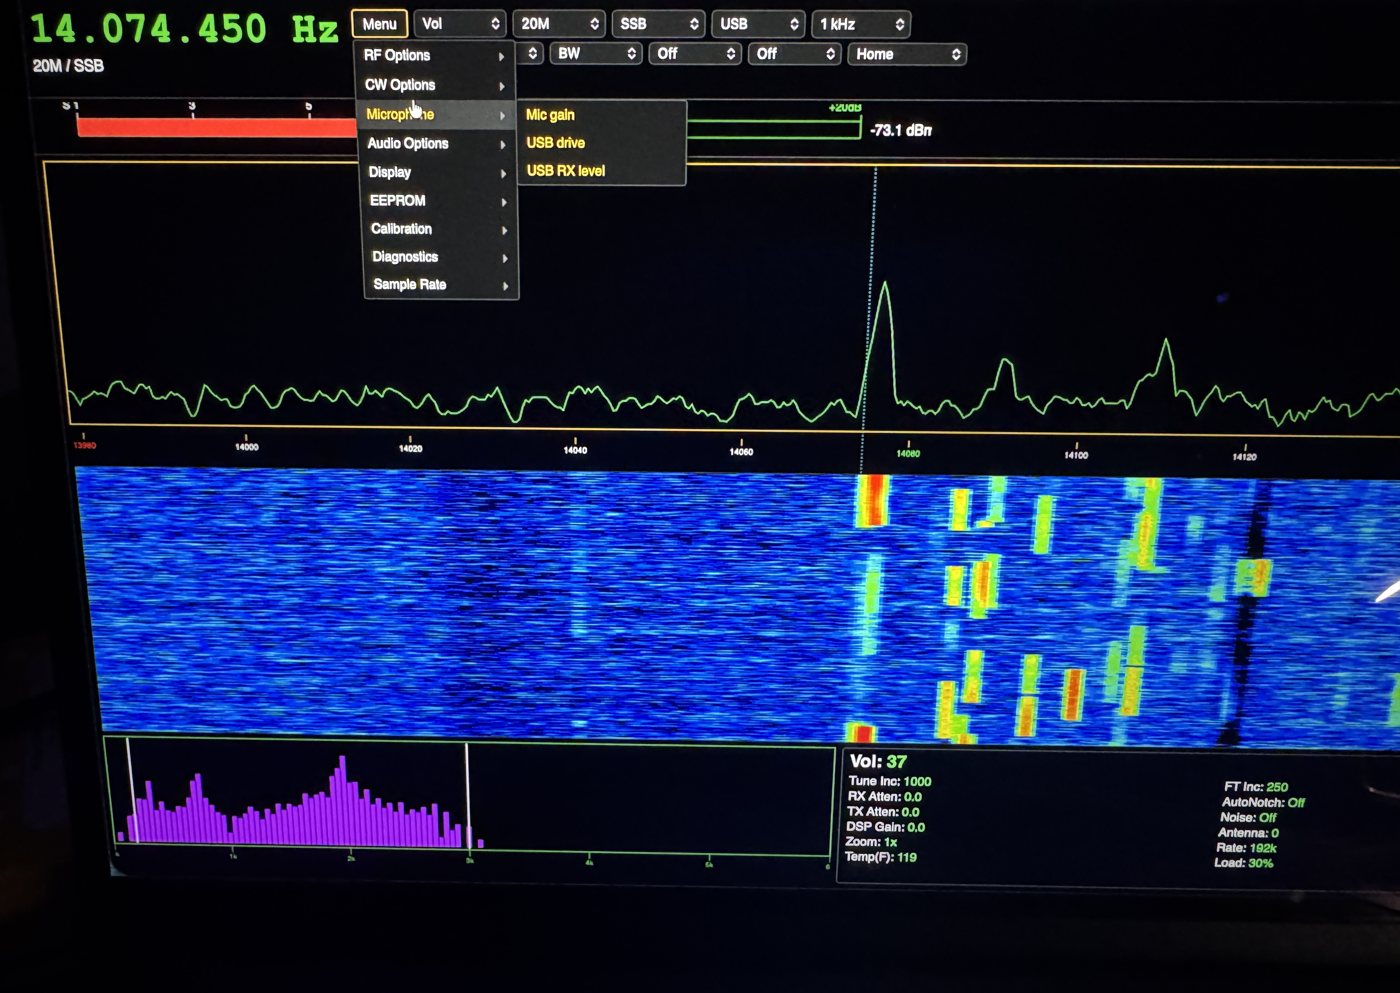
The web remote in a browser, reaching the radio through the Pi 5Choosing from the Menu in the browser: Microphone and its submenu
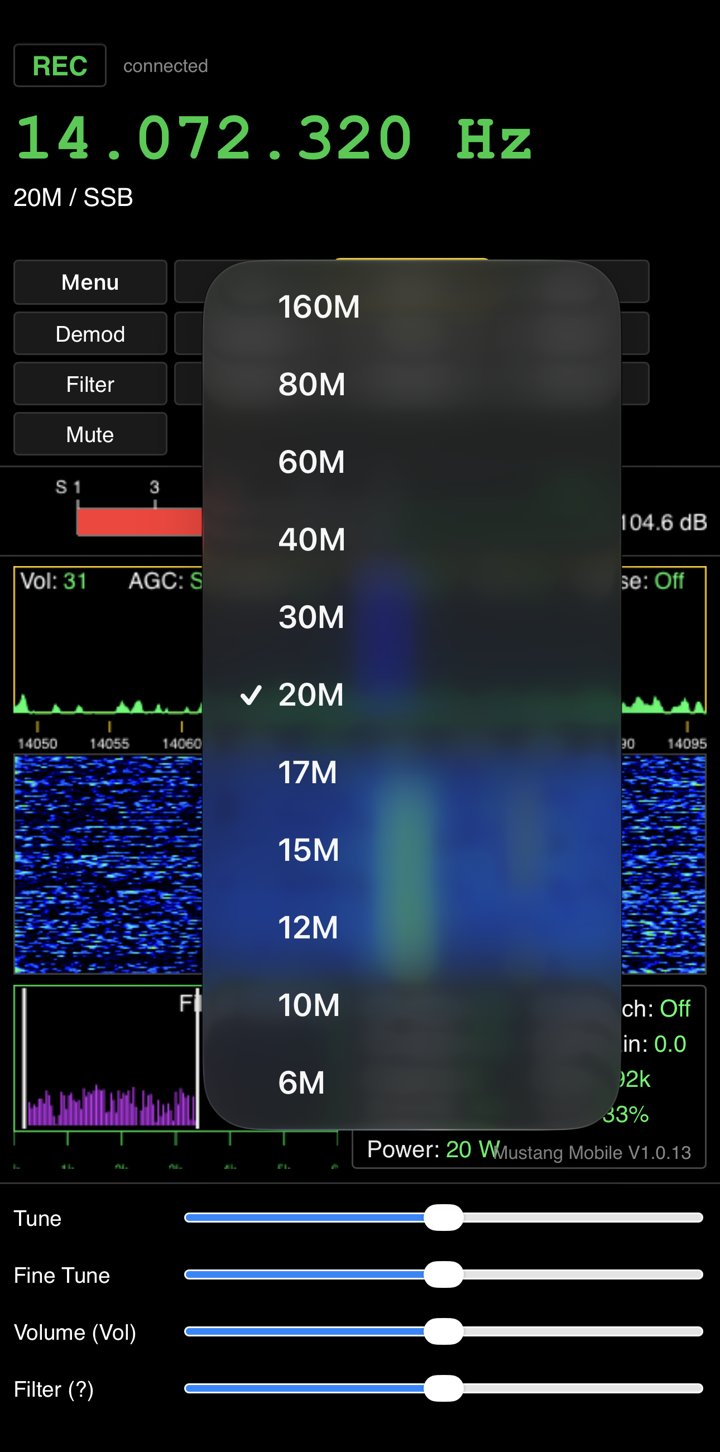
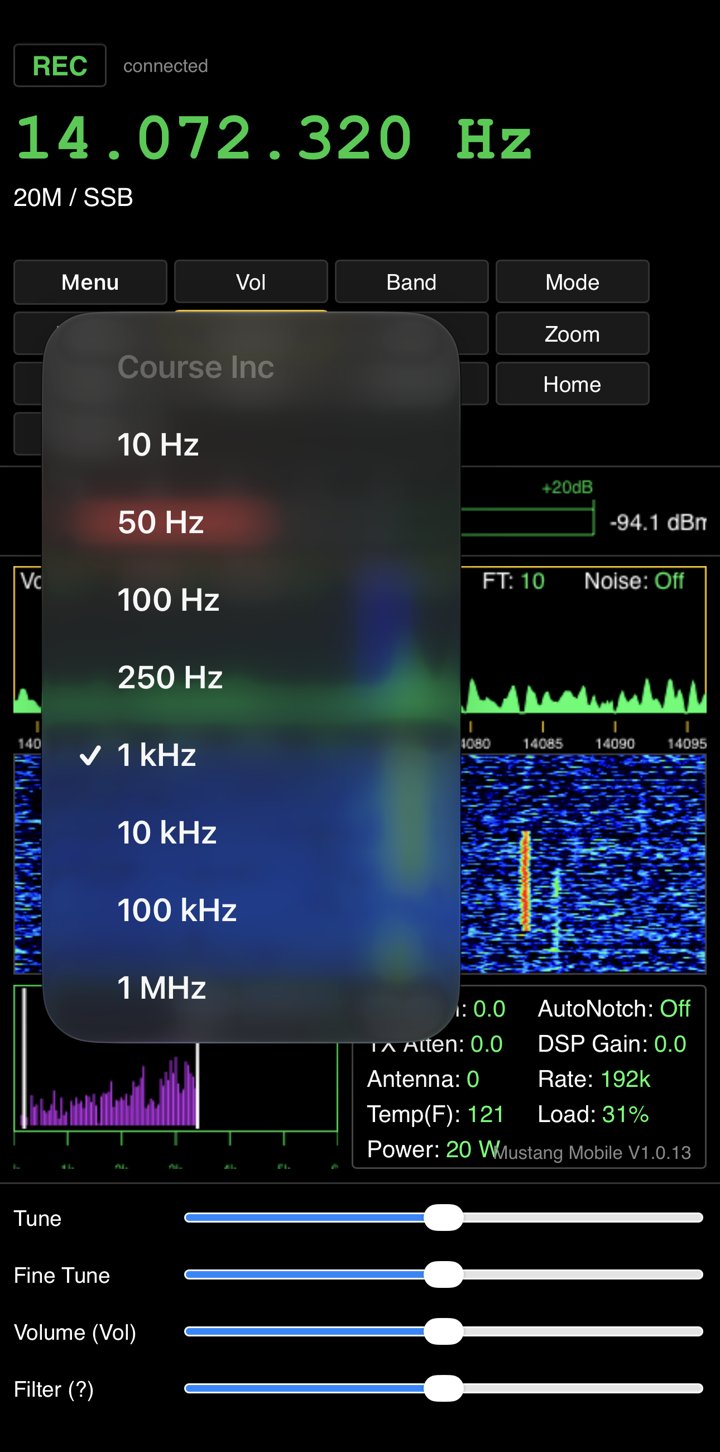
Mustang Mobile, with the touch sliders at the bottomMenu → DisplayBand as a native iPhone pickerCourse Inc tuning step
LAN onlyThe web remote has no encryption. Don’t forward port 8765 through your router to reach it from outside your home network.
Hardware
Secondary CPU
Raspberry Pi 5, 2 GB
Display
Raspberry Pi Touch Display 2, 7″ (720 × 1280, portrait native, rotated to landscape), DSI, using the “Standard – Mini” Touch Display cable (22-way on the Pi 5, 15-way on the display)
Power
Geekworm RPI5-5V5A-PD (terminal-block version) fed from its own fused branch off the 12 V distribution block, 5 A ATO fuse. It does real USB-C PD, so the Pi 5 runs at full performance with its overvoltage protection intact. Mean Well SD-25A-5 / SD-15A-05 GPIO-powered alternates are in the Integration Procedure
Display power
The display’s own power cable: red to Pi pin 2 (5 V), black to Pi pin 6 (GND)
UART link
Pi pin 8 (GPIO14 TXD) → Teensy pin 0 (RX1); Pi pin 10 (GPIO15 RXD) → Teensy pin 1 (TX1); plus a GND wire between the boards
USB audio
A USB cable from the Teensy’s own USB port to a Pi 5 USB-A port, with the firmware built as “Serial + MIDI + Audio”. Check that the Teensy’s VUSB–VIN link is cut first, so the Pi can’t back-feed 5 V into the main board
Mouse
Any wired USB mouse; a USB rotary encoder is optional for the web remote
CheckTeensy pins 0/1 are only free if your main board uses the Voltage reversal prevention power option. The alternate Shutdown routine activation option (ATtiny85) uses the same two pins, and every other Teensy hardware UART is already taken on this board.
Never tie the Pi’s 5 V to the Teensy board’s own 5 V regulator. The two share a ground only.
UART connections
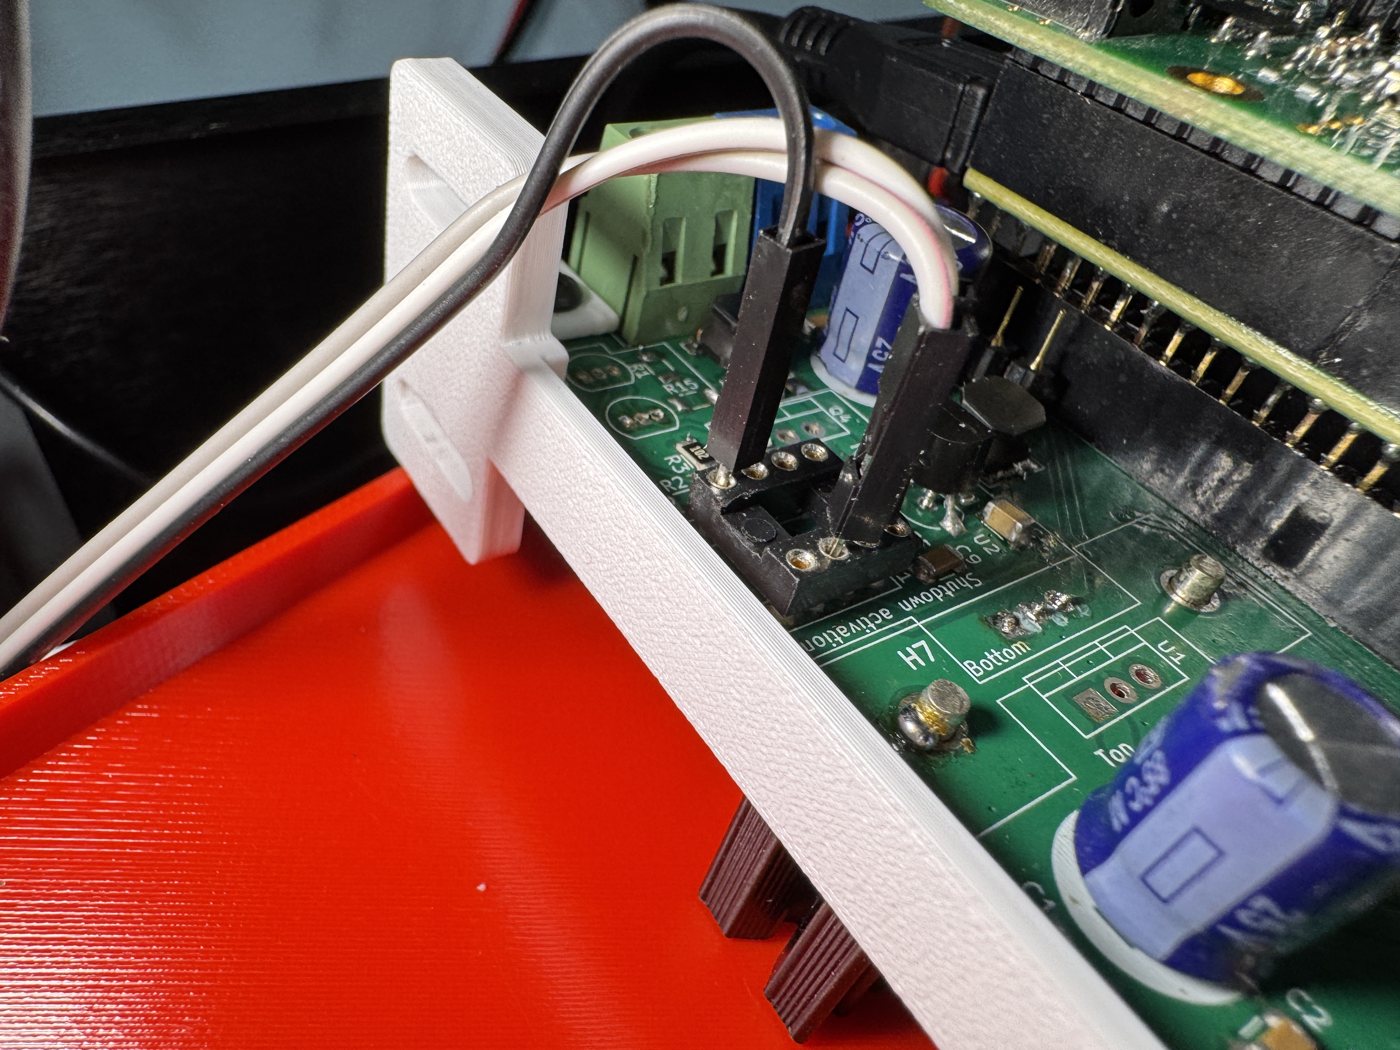
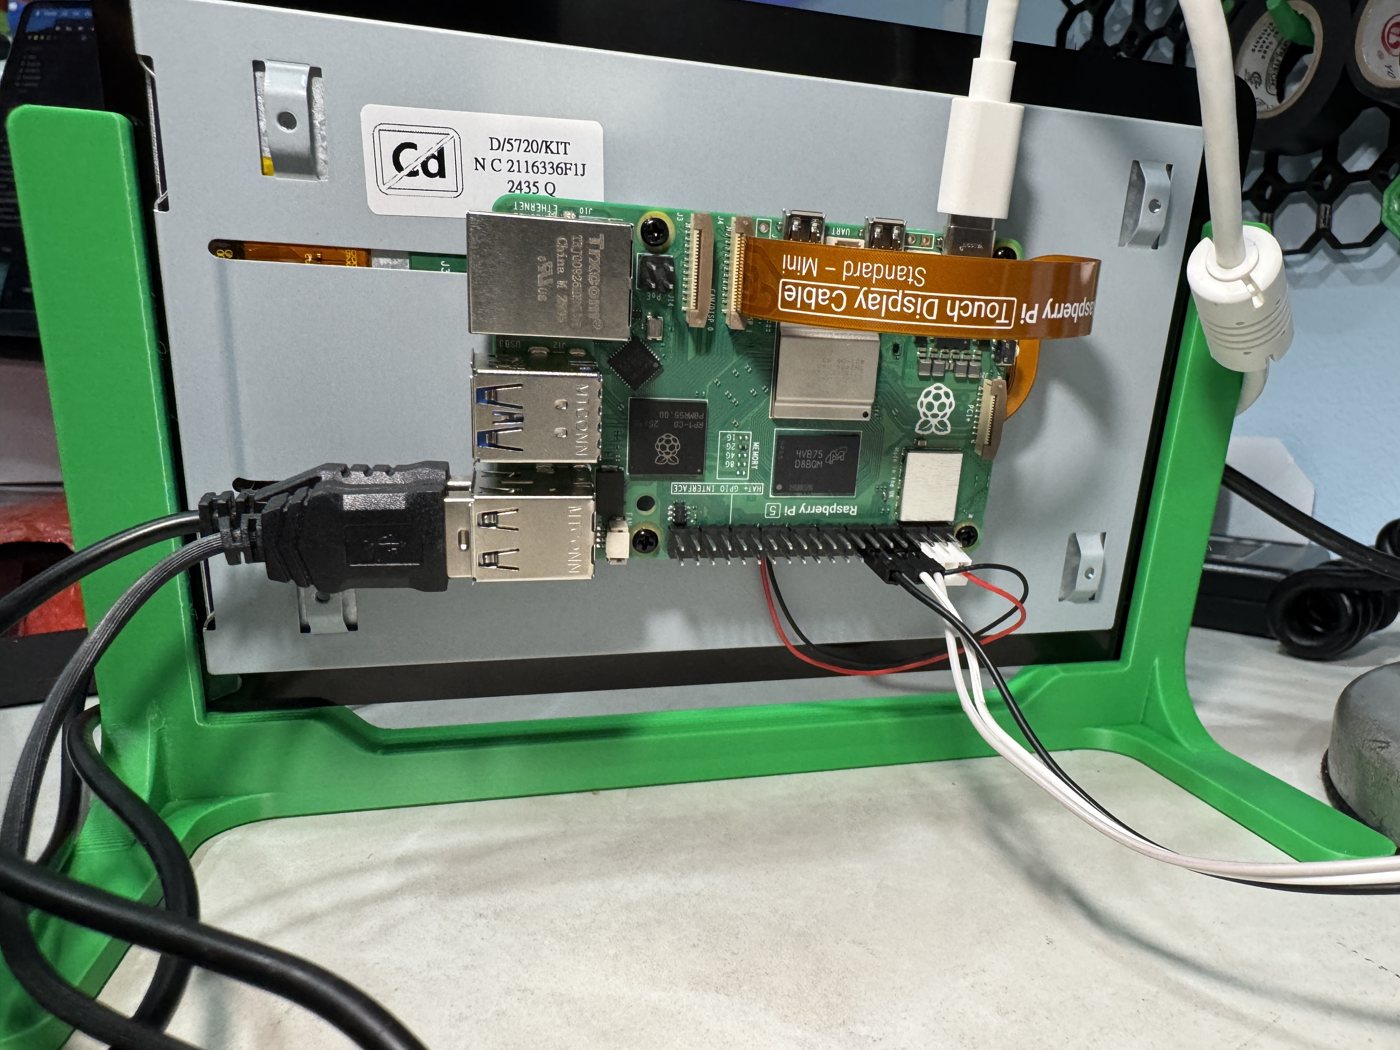
On the T41 main board: the PiLink wires plug into the empty ATtiny85 socket in the unused “Shutdown activation” section, which is wired to Teensy pins 0 and 1On the Pi 5 (on the bench, on the back of the Touch Display 2): UART wires and the display’s red/black power leads on the GPIO header, and the Touch Display ribbon
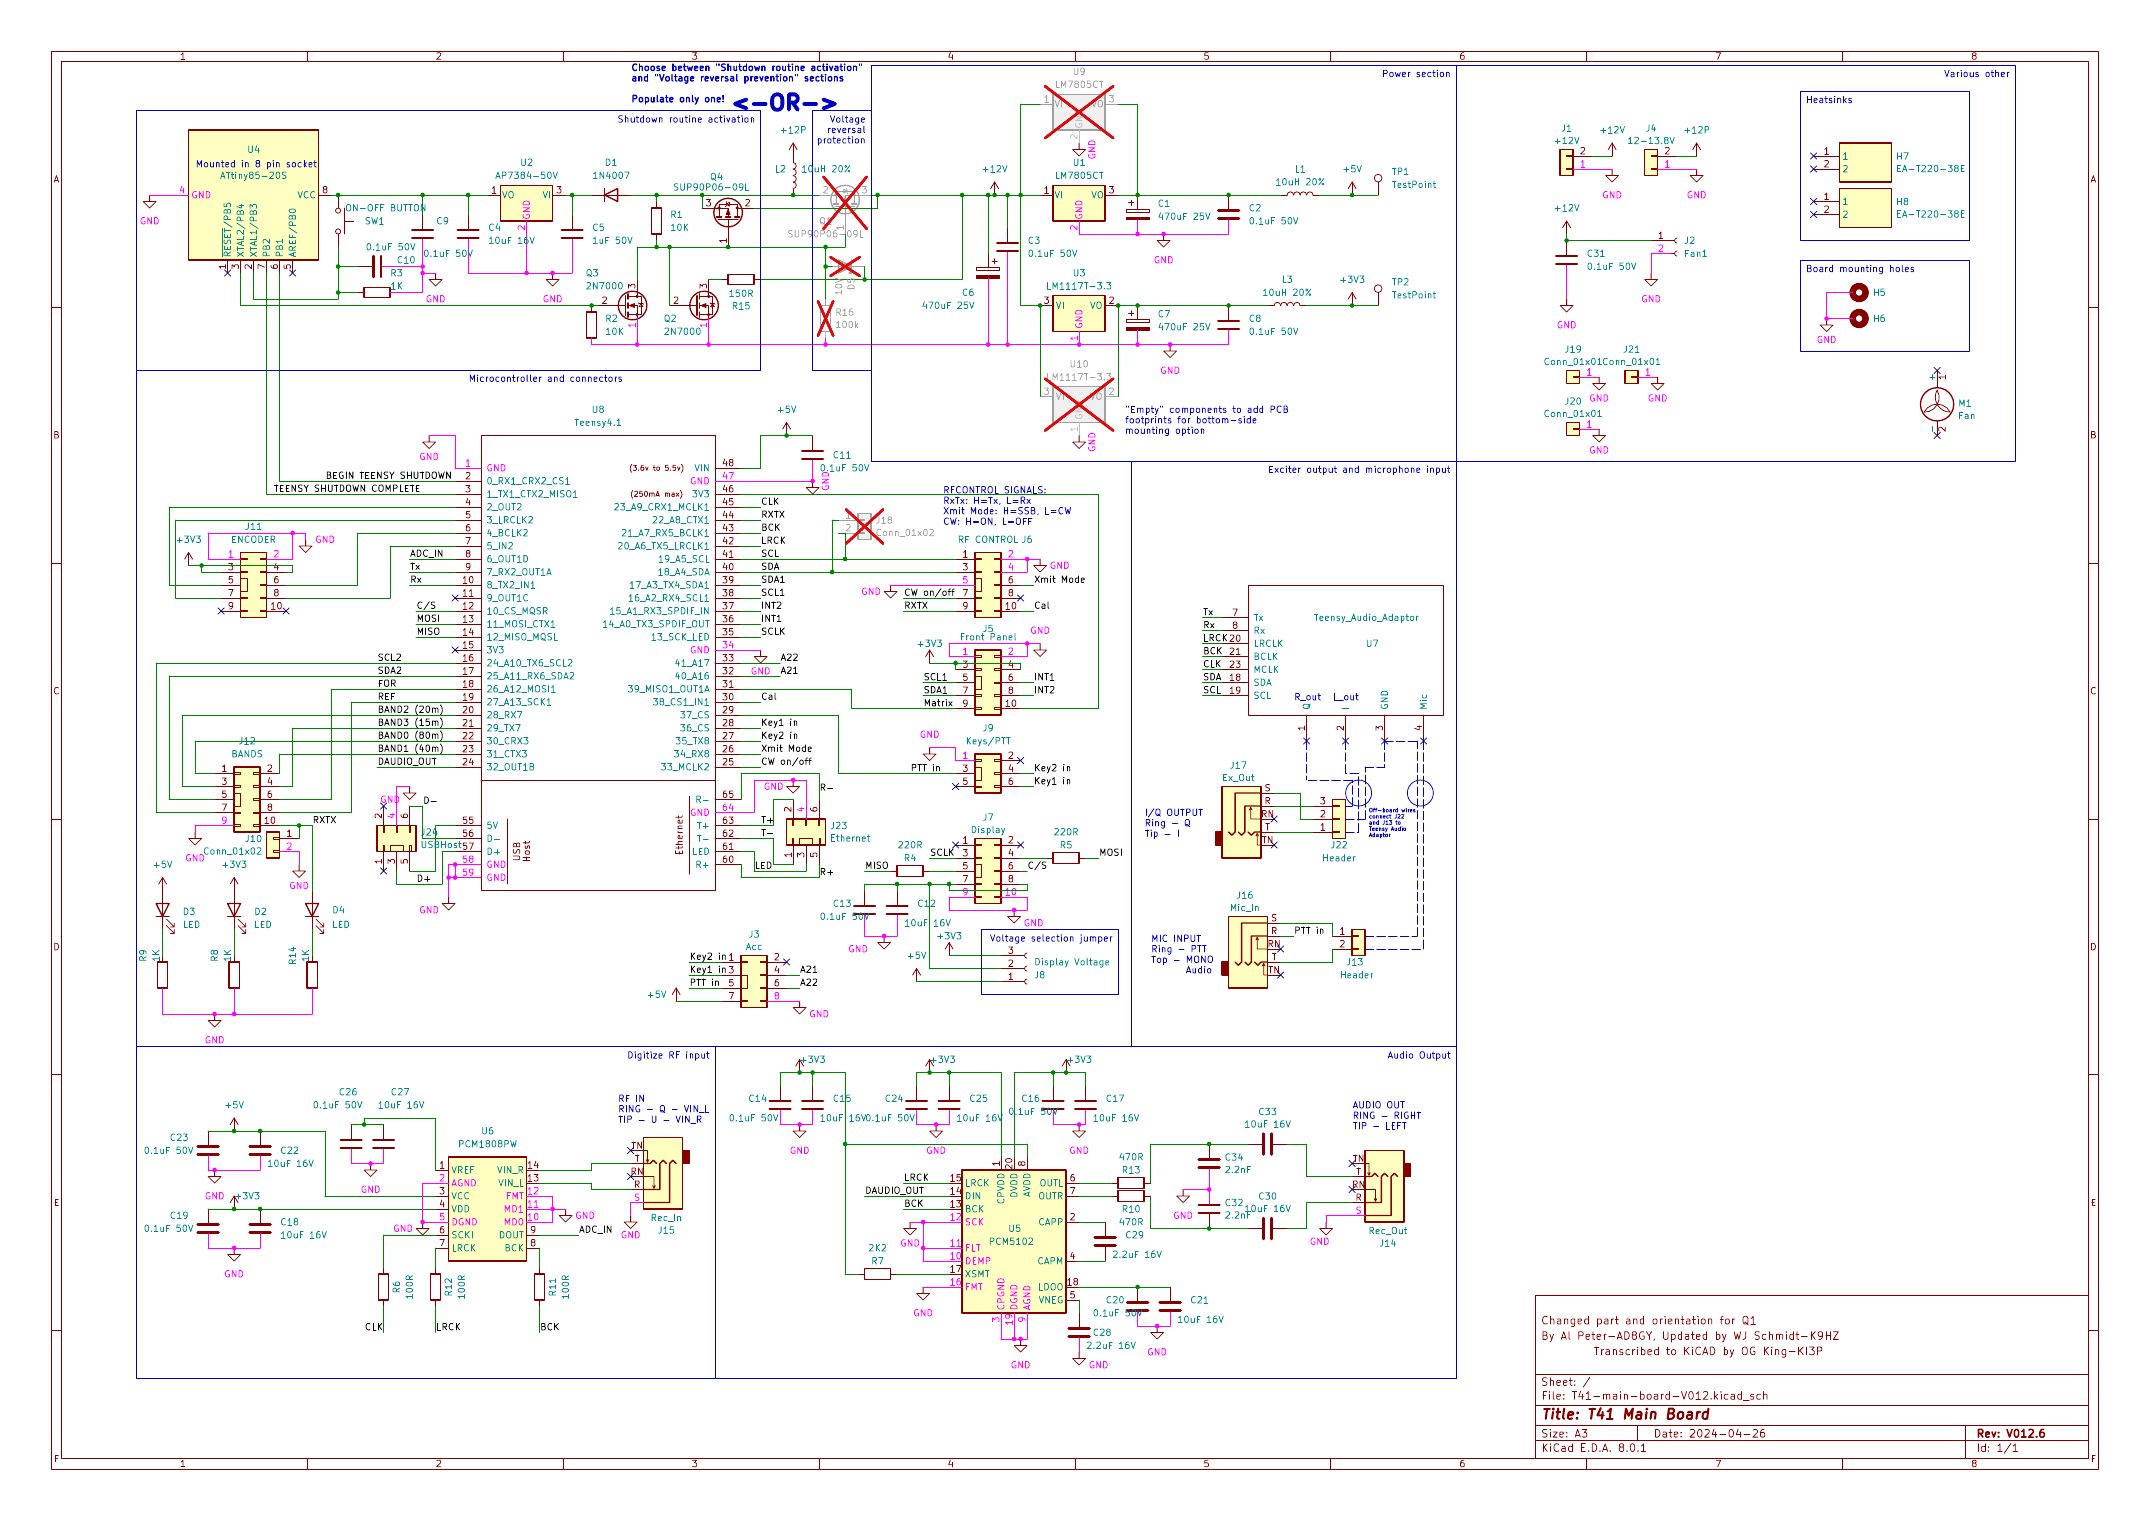
Main board schematic
T41 Main Board schematic V012.6 (select to open the PDF)
UART link
921,600 baud on the Teensy’s Serial1, with a 1 KB transmit buffer so a whole spectrum frame fits.
Teensy → Pi
Message
Rate
Carries
STATUS
10 Hz
Frequency, band, mode, TX/RX, power, filter and passband edges, keyer WPM, SAM offset, the visible spectrum span, the band’s legal limits and (V1.0.15) where the Menu is
SMETER
20 Hz
Signal level in 0.1 dB steps
SPECTRUM
~15 fps
512 bins, one byte each, scaled with the Teensy’s own spectrum scale and floor settings
AUDIO_SPECTRUM
~15 fps
The live audio-FFT bars
SETTINGS
2 Hz
Everything on the Settings pane, the firmware version, Decode on/off, which home layout is showing, and the spectrum scale, floor and fill settings
PARAMETER
10 Hz
The red “Label: value” box, only while a Menu setting is being adjusted
RXIQ_CAL
10 Hz
The Receive IQ calibration screen, while it’s open
BIT_RESULTS
2 Hz
I2C BIT test pass/fail per board, while that screen is open
EQUALIZER
10 Hz
The Audio Equalizer screen (V1.0.26)
TXIQ_CAL / FREQ_CAL / POWER_CAL
10 Hz on screen, 2 Hz off
The Transmit IQ, Frequency and Power calibration screens (V1.0.30)
WATERFALL
~15 fps
The radio’s own colour for every waterfall point, so the Pi’s waterfall matches the T41 (V1.0.32)
CW_DECODE
10 Hz decoding, 2 Hz off
Decoded CW text, WPM and the CW settings page values (V1.0.33 / V1.0.34)
Pi → Teensy
Message
Carries
Purpose
VIRTUAL_BUTTON
One button id
A click, fed into the same button queue as the front panel
VIRTUAL_ENCODER
Knob + direction
One click of the Filter, Volume, Tune or Fine-tune knob, exactly like turning the real encoder
VIRTUAL_BUTTON_REPEAT
Button id + count
Presses the same button several times in one go, so jumping several steps in a dropdown is near-instant
A bad CRC drops the frame and the receiver scans ahead for the next 0x7E 0xA5. The Teensy parses one byte at a time so it never holds up the main loop.
Software
Teensy:PiLink.h / PiLink.cpp in the Mustang 2 sketch, started from InitializePiLink() and polled every pass of the main loop.
Pi: Raspberry Pi OS (64-bit, with desktop) running radio_ui.py, a full-screen Tkinter app, with pilink_client.py handling the protocol web_relay.py serving the browser remote and audio_relay.py passing the receive audio to it. It starts at boot as a user systemd service, and the SD card runs read-only so the Pi survives the radio’s power being switched off abruptly.
Firmware changes need the Teensy reflashed; Pi-only changes just need the PiDisplay folder copied to the Pi and radio_ui.py restarted. The full wiring, OS setup and test checklist are in the Integration Procedure below.
Changelog
Mustang 2 firmware and Pi display, newest first. The version on the Teensy’s Settings pane is what’s actually running.
V1.0.29 – V1.0.34 Current download
Calibration > Transmit IQ, Frequency, Power and S meter level on the Pi and both remotes, with Exit and (Transmit IQ) Stop.
CW: decoded text under the waterfall and the radio’s CW settings page while Decode is on.
Waterfall in the radio’s own colours; brighter 2D and 3D blues; the frequency readout no longer shows through full-screen pages.
Powers up in DATA mode; the radio’s spectrum fill and PI Spectrum Fill both start off.
V1.0.26 – V1.0.28
Audio Equalizer screen on the Pi and both remotes (Edit RX / Edit TX, Exit, Save & Exit); menu picks jump straight to the item; “Load:” reading fixed.
New toolbar: Display, Audio, Mic and CW dropdowns; Vol is a button; three toolbar rows on the Pi with REC and SWR at the right edge; menus highlight the current choice.
Smooth 3D waterfall with 2D / 3D and speed settings; Freq Font styles (Nixie, VFD, Dot Matrix); Pi settings remembered across restarts.
Menu > Network on the Pi screen: change Wi-Fi networks, with an on-screen keyboard for the password.
DSP: on the readout line, Vol: in the Settings pane, TI: renamed CT:; arrow-key control of tuning, Filter and Volume.
V1.0.25
I2C BIT test screen on the Pi and both remotes; Menu items without a Pi/remote screen are greyed out there for now.
V1.0.23 – V1.0.24
Receive IQ calibration screen on the Pi and both remotes, with full control; the Pi screen adds Stop and Exit.
V1.0.21 – V1.0.22
Choppy audio fixed: the filled spectrum trace could stall the audio. New Menu > Display > Spectrum fill on/off on the radio, and a separate PI Spectrum Fill for the Pi and remotes.
V1.0.17 – V1.0.20
New Menu > RF Options > RX DSP Gain; Scale: and Floor: readouts; readout strip moved above a shorter spectrum trace; Menu > Display > Brightness for the Pi touchscreen; SWR/PWR on both web remotes.
V1.0.16
Jumping several steps in a dropdown (Zoom, Band, Mode and so on) is now near-instant.
Mustang Mobile phone page at /mobile with Tune / Fine Tune / Volume / Filter touch sliders.
V1.0.15
The Teensy now sends the Menu’s real position, so choosing a Menu item from the Pi or the browser always lands on the right setting instead of sometimes jumping back to Home (reflash needed).
V1.0.14
Live receive audio in the browser remote, with a Mute button.
Blue filter-bandwidth highlight on the spectrum, on the Pi and in the browser.
Desktop icons to start the radio app and shut down the Pi.
Browser remote control on the home network, with passkey, mouse-wheel tuning and USB rotary encoder support.
Tune and Fine-tune knobs can now be turned from the Pi or the browser (reflash needed).
Browser remote gains the audio spectrum, Settings pane and a real cascading Menu.
New BW (filter) dropdown, and a “Wheel:” indicator that hands the wheel back to tuning.
V1.0.13
Frequency ruler under the spectrum, with out-of-band ticks in red, like the Teensy’s own screen (reflash needed).
V1.0.12
“Select >” button on the Menu parameter box to confirm a value.
The Pi follows the Teensy’s secondary (“Toggle Layout”) home screen.
V1.0.11
Fixed: Menu → Display spectrum scale and floor now change the Pi’s spectrum too.
V1.0.10
Vol dropdown (Vol / AGC / Mic / Sidetone), with the mouse wheel adjusting whichever is selected.
Toolbar rearranged into two rows.
V1.0.9
Red “Label: value” box when adjusting a Menu setting, with the mouse wheel changing the value.
V1.0.8
Band dropdown replaces BAND +/−, plus Mode, Demod, Noise, Course Inc, Fine Inc, Decode, Home and a two-level Menu, all built from the firmware’s own tables.
Menu opens with cascading flyouts; larger touch targets.
V1.0.7
Fixed: REC/XMT could show XMT while receiving.
Spectrum fill and waterfall now use the Teensy’s own colors; Settings pane restyled to match.
V1.0.6
Settings pane now shows everything the Teensy’s does; the desktop panel appears when the mouse touches the top edge.
V1.0.5
Live audio-spectrum bars.
V1.0.3 – V1.0.4
Fixed: spectrum was a flat line, then empty (bigger serial buffer).
Waterfall now scrolls top to bottom like the Teensy’s.
V1.0.2 and earlier Baseline
The original PiLink link, S-meter and SWR/power panes.
Future
Already done since this page first went up: the hardware checkout, dropdown menus with the mouse, sending settings back to the Teensy (through button presses and knob turns), the rest of the Home screen, band and mode names, real button ids, the browser remote on the home network and live audio to it, and matching the firmware source to the Pi software. Still to come:
Digital modes: FT8 / WSJT-X Next
The Teensy’s USB audio already reaches the Pi and feeds the browser remote. The same cable also carries CAT (frequency, mode, PTT), so the next step is running WSJT-X on the Pi and showing FT8 decodes on its screen. The plan is in the FT8 / WSJT-X procedure below.
Finish the browser remote Planned
State of Health isn’t on the web page yet. Before allowing transmit from the browser, add a PTT time-out, a lock so the screen and the browser can’t fight over control, and check the rules for remote operation of your station.
Port the remaining Menu screens Planned
Diagnostics > Restore receive EQ and Buffer print, and EEPROM > Print data to Serial, are greyed out on the Pi and remotes until each gets its own screen. (The Calibration screens were done in V1.0.30.)
Remote access from outside the home Idea
Only with encryption (TLS) and a stronger passkey, or through a VPN, never by simply forwarding the port.
Accurate time for FT8 Idea
FT8 needs the clock within about a second. NTP works on the home network; for portable use, add the Pi 5’s RTC battery or a small GPS.
Saving Pi settings
The Pi’s SD card is read-only so an abrupt power-off can’t corrupt it. If the Pi gets settings of its own, EEPROM → “Save data to storage” on the Teensy could also tell the Pi to save, through a new commit-settings message and a read-only setup that can be briefly unlocked without a reboot.
Version check between the boards
The Pi shows the firmware version, but nothing stops a mismatch. A short hello message with a protocol version would let the Pi warn clearly when its code doesn’t match the Teensy firmware.
Ethernet, if the UART runs out Option
The link has grown to fourteen downlink messages. If it ever gets tight, the Teensy 4.1’s Ethernet header (PJRC Ethernet kit + QNEthernet) straight to the Pi’s Ethernet port is the upgrade path. It replaces the whole link, so it’s a project of its own.
RF noise check
The Pi 5 and a second display are new noise sources right next to the receiver. Listen for birdies on every band with the Pi running, and plan for ferrites on the USB, DSI and power leads and a shield like the Display Shield.
Cooling and mounting in the case
Fit the Pi 5 Active Cooler once it’s in the closed case, and publish the Pi mount and touchscreen adapter plate STLs here once they’re fit-checked.
User guide · Mustang 2 V1.0.34 · /mobile V1.0.55 · as of 4 Oct 2026
Remote Access
How to reach the radio from a browser on the home network, log in, and drive it: what every control does, tuning with a mouse wheel or a USB rotary encoder, live audio and the Mute button, and what to try if something looks stuck.
The same radio from four places at once: the Pi Touch Display (left), the T41’s own screen (back), /mobile on an iPhone (center) and /remote in a laptop browser (right)
Connecting
The web remote is served directly by the Raspberry Pi 5 — no separate web server, app or account needed. On any computer, tablet or phone connected to the same home network as the radio, open a browser and go to:
http://<pi-hostname>:8765/
Replace <pi-hostname> with the Pi’s network name (for example mustang.local) or its IP address. The page asks for a passkey before it connects — this is set in the Pi’s config.py and is separate from any home network Wi-Fi password. Once you’re logged in, the page starts mirroring the radio immediately.
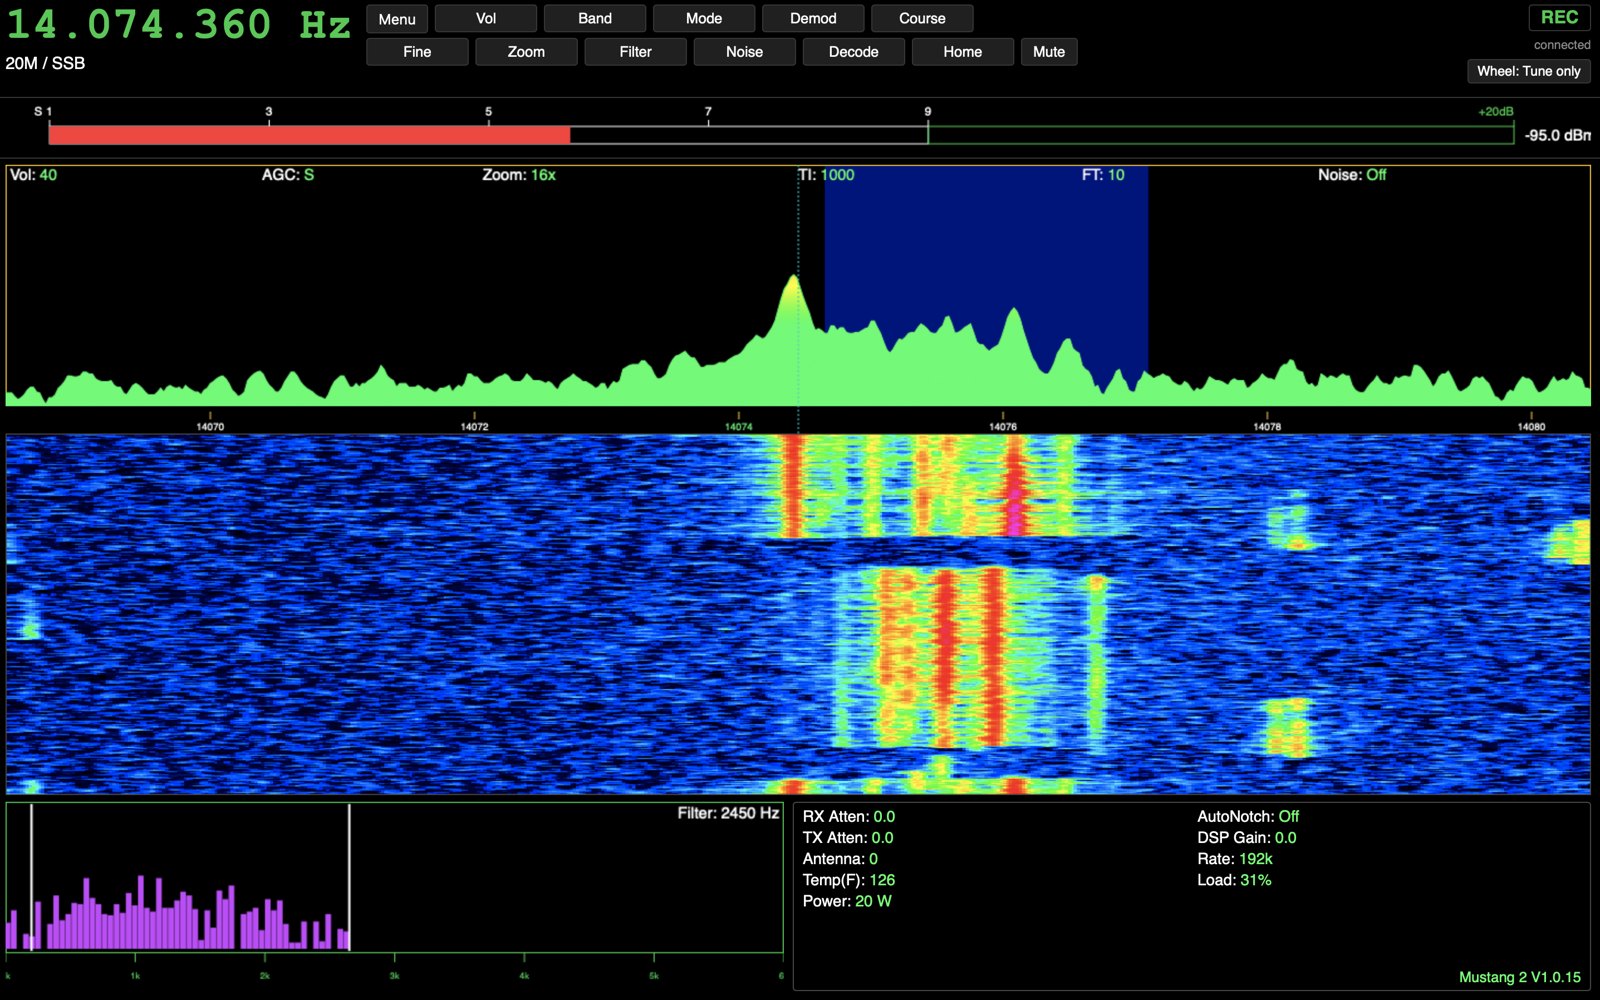
The web remote (V1.0.15) at 14.074.360 on 20 m, zoomed to 16× on the FT8 signals — readout strip across the top of the spectrum, blue filter highlight, live waterfall
On a phone: use the phone page, Mustang Mobile, at http://<pi-hostname>:8765/mobile. The toolbar becomes a six-column grid of buttons that open as the phone’s own pickers, the Menu flyouts open with a tap, and four touch sliders at the bottom replace the mouse wheel (see Tuning).
Mustang Mobile, with the touch sliders at the bottomMenu → DisplayBand as a native iPhone pickerCourse Inc tuning step
Browser support: any modern desktop or mobile browser works — Chrome, Firefox, Edge and Safari have all been used with it. No plugins, extensions or app install are needed.
Layout & panes
The page mirrors the same panes as the radio’s own screen and the Pi’s Touch Display, arranged the same way:
VFO / frequency readout across the top, with band and mode next to it and REC/XMT showing which state the radio is in.
Toolbar of dropdown controls just under the frequency (see below).
S-meter, live at 20 Hz.
Spectrum & waterfall: the live trace fills green through yellow to red by signal strength, the receive passband is highlighted in blue, and a frequency ruler runs underneath with out-of-band edges marked in red.
Audio spectrum: the live audio-FFT bars with the passband edges and CW filter markers.
Readout strip just above the spectrum: AGC, DSP, Scale, Floor, Zoom, CT (course tune increment), FT (fine-tune increment) and Noise.
SWR / PWR readout next to REC/XMT.
Settings pane: RX/TX Atten, AutoNotch, Vol, Antenna, Rate, Temp, Load and Power, plus the firmware version. With CW Decode on it switches to the radio’s CW settings page, and the decoded text runs in a strip along the bottom of the waterfall. The audio spectrum pane shows the current Filter width.
Toolbar & Menu
Every toolbar dropdown drives the radio exactly as if you’d pressed the matching front-panel button or turned the matching knob — there’s no separate remote-only logic to learn.
Display, Audio, Mic, CW — copies of the radio’s own Display, Audio Options, Microphone and CW Options menus, next to Menu.
Vol — a button: click it and the mouse wheel and all four arrow keys change the volume.
Filter — Hi Cut / Lo Cut; once picked, the mouse wheel and the Left/Right arrow keys move that edge.
Band, Mode, Demod, Course Inc, Fine Inc, Zoom, Noise, Decode, Home — one click each, built from the firmware’s own tables so the choices always match what’s actually loaded on the radio.
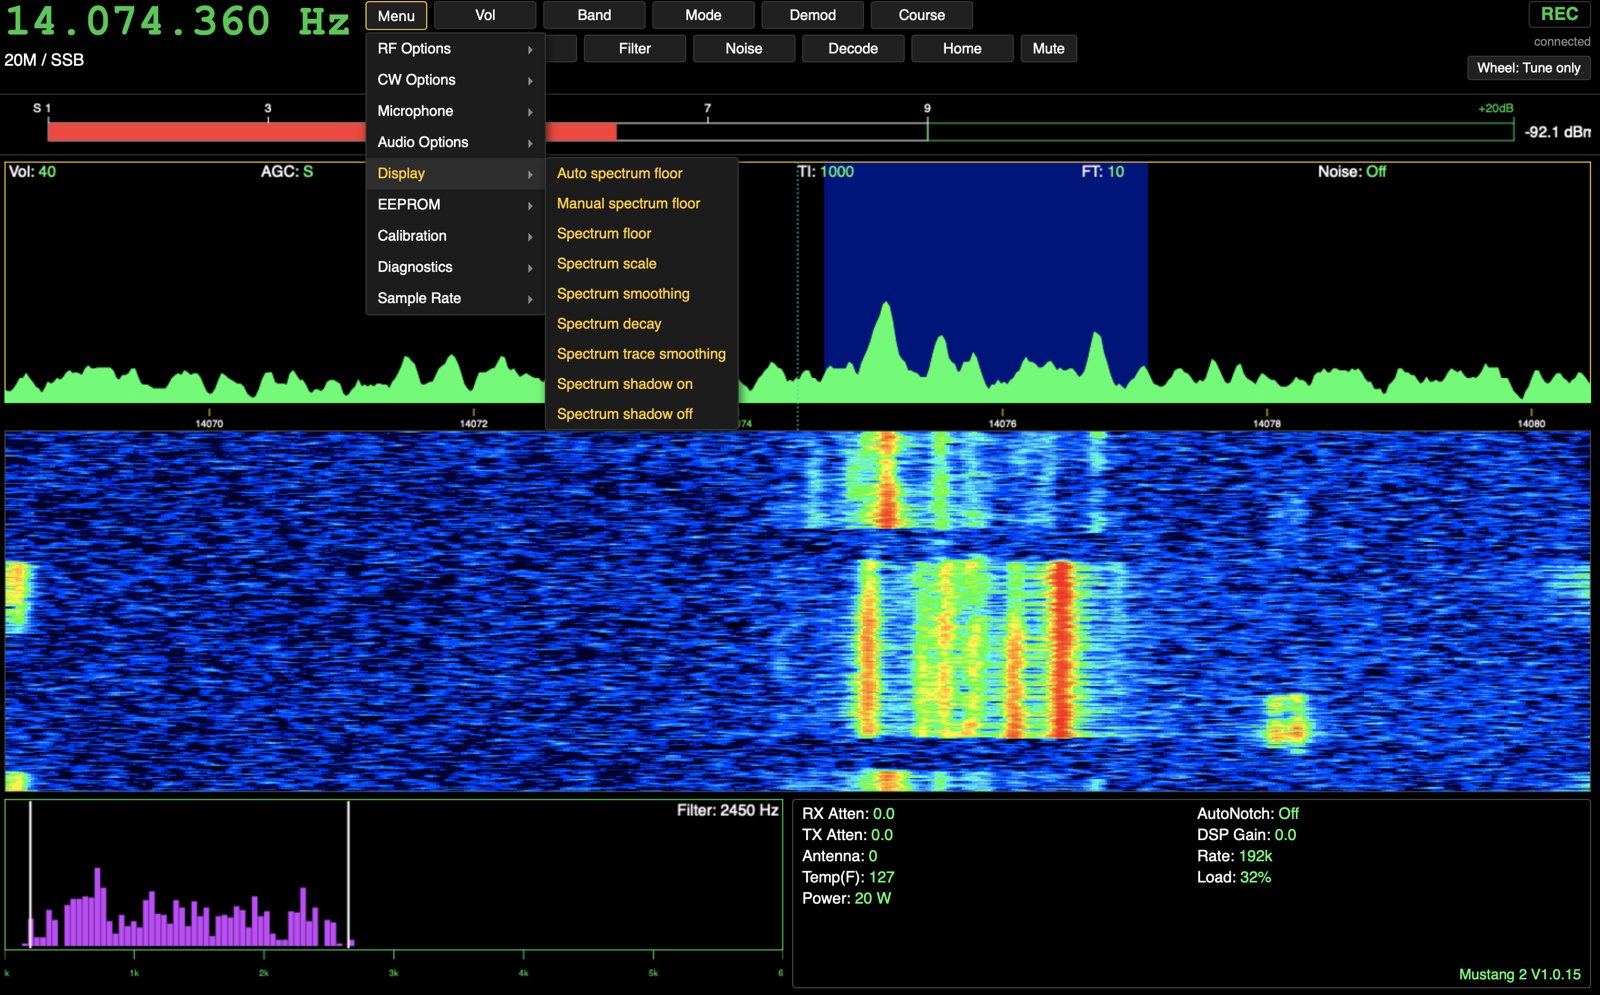
Menu — a cascading popup like a desktop app: click Menu, then a category, and its options fly out to the side. Picking a setting opens the same red “Label: value” box the radio’s own screen shows, with the mouse wheel changing the value and a “Select >” to confirm.
Calibration and test screens — every Menu > Calibration item, the Audio Equalizer and Menu > Diagnostics > I2C BIT test open right in the page; arrow keys adjust the main values on the calibration screens. The few items that don’t have a remote screen yet are greyed out and can’t be picked for now; they still work from the radio’s front panel (the Mustang Reference marks which ones).
Mute — sits with the other dropdowns and turns red while muted. It only silences audio in your own browser tab; it doesn’t touch the Pi’s own speaker, other people viewing the page, or what the radio is actually receiving.
A “Wheel:” status pill shows what the mouse wheel currently controls — Tune only, Volume, or Filter. Clicking Vol, or picking Hi Cut / Lo Cut from Filter, claims the wheel (and the arrow keys) for that knob; click the pill to release it back to tuning-only.
The cascading Menu: pick a category, then an option from its flyout — Display and its Spectrum submenu shown here
Tuning
Two ways to move the VFO from a browser:
Mouse wheel over the frequency readout or the spectrum — turns the main tuning knob. Hold Shift while scrolling for fine tuning.
A USB rotary encoder, configured (in its own software or a keyboard-emulation mode) to send arrow or page keys — drives the VFO the same way regardless of where the mouse pointer is.
On the phone page, use the four sliders at the bottom: Tune, Fine Tune, Volume and Filter. Drag one away from the center to turn that knob, further for faster; it springs back to the center when you let go. The Volume label shows which of Vol/AGC/Mic/Sidetone it will change, and the Filter label shows Hi Cut, Lo Cut, or “Menu” while a Menu setting box is open.
Tuning always works this way, independent of whatever the plain mouse wheel is currently claimed for (Volume or Filter) — the two knobs don’t interfere with each other.
Audio & Mute
When the Teensy’s USB audio is wired to the Pi, the web remote streams live receive audio to every logged-in browser — uncompressed, over the same connection as everything else, with no codec or plugin to install. Playback starts automatically once you’re logged in (browsers require a user click before audio can start, which logging in already provides).
The Mute button in the toolbar turns red while muted. It is local to your browser tab only: it doesn’t stop the Pi from sending audio, and has no effect on the radio, the Pi’s own speaker, or any other viewer’s audio.
If you don’t hear anything: the Teensy’s USB audio cable to the Pi may not be connected, or the Pi’s audio software isn’t installed. Either way, nothing else on the page is affected — video/telemetry keeps working normally.
Security
LAN onlyThe web remote has no encryption — it’s plain ws://, not wss://. Don’t forward port 8765 through your router to reach it from outside your home network. The passkey stops casual access on the LAN; it isn’t a substitute for TLS against a hostile network.
Reaching the radio from outside the home would need real encryption and a stronger passkey, or a VPN back into the home network — never a plain port-forward. This is tracked as a future item on the Secondary CPU page.
Troubleshooting
Page won’t load
Confirm the computer is on the same network as the Pi, and that radio_ui.py is running on the Pi (it also runs the web server). Double-check the hostname/IP and that :8765 is included in the URL.
A recent change doesn’t seem to show up
Browsers can cache the page. Do a hard refresh instead of an ordinary reload: Ctrl+Shift+R (Windows/Linux) or Cmd+Shift+R (Mac), or open the browser’s developer tools and enable “Disable cache” while the page is open.
Login asks again every time
Normal — the passkey isn’t stored between sessions on purpose.
Menu pick jumps back to Home
Fixed in V1.0.15, which sends the Menu’s real position to the Pi. Check that the Settings pane shows Mustang 2 V1.0.15 or later (currently V1.0.34); if not, reflash the Teensy.
No audio
See Audio & Mute — usually a disconnected USB audio cable or missing Pi-side audio software, not a browser problem.
CW page shows “--”
WPM and SNR fill in once the decoder locks, and Dit, AvgD/D, Upd Age and Coeff only while in CW receive with Decode on — the same as on the radio. If AT Grace, Mode and Key Type also show “--”, the radio needs firmware V1.0.34.
Spectrum/waterfall frozen
Check the Pi’s own screen first — if it’s frozen too, the issue is the PiLink link or radio_ui.py itself, not the browser page.
Known limits
State of Health isn’t on the web page yet.
A few Menu items are greyed out until they get their own remote screen (Diagnostics > Restore receive EQ, Buffer print; EEPROM > Print data to Serial).
No PTT time-out or screen/browser lock yet — two people driving it at once can conflict.
LAN only, as above — no remote access from outside the home network.
See the Secondary CPU project page for what’s planned next.